
Learning to play the guitar is an incredibly rewarding journey, but for many beginners, the initial excitement is quickly met with a physical hurdle: finger pain and hand fatigue. When you first try to press down on the strings to form basic chords like G major or C major, you might find yourself squeezing with all your might, only to produce a muffled, buzzing sound. This common struggle rarely stems from a lack of finger strength. Instead, it is almost always a direct result of high string action and poor instrument geometry.
String action—the height of the strings above the fretboard—is the single most important factor determining how easy or difficult a guitar is to play. A guitar with low action requires minimal downward pressure to fret a note cleanly, allowing you to focus on finger placement, rhythm, and muscle memory rather than fighting the instrument. By understanding how guitar design, string tension, and professional adjustments work together, you can select or configure an instrument that makes chord pressing comfortable and keeps you motivated to practice.
Why String Action and Neck Comfort Dictate Playability
To understand why some guitars feel effortless while others feel like a workout, you must look at the physical mechanics of the instrument. String action is measured as the gap between the top of the fret wire and the bottom of the string, typically evaluated at both the first fret (near the headstock) and the twelfth fret (midway down the neck). When this gap is too wide, your fingers must push the string a greater distance before it makes solid contact with the fret. This extra distance requires exponential physical force, which quickly leads to muscle fatigue, cramping, and deep soreness in your fingertips.
Products mentioned in this guide

Prices are valid at publication and may change. Please refer to the product page for the latest price.
Beyond the height of the strings, the physical shape of the guitar neck plays a massive role in how easily your hand can position itself to press chords. The neck profile, or the cross-sectional shape of the neck, dictates how your thumb and palm rest against the back of the wood. A thick, chunky neck requires a wider hand span, which can strain smaller hands. Conversely, a modern C-shape or thin-U profile is much slimmer, allowing your hand to wrap comfortably around the fretboard and giving your fingers a better angle of approach to press down vertically on the strings.
The curvature of the fretboard itself, known as the fretboard radius, also influences comfort. A smaller radius means a more curved fretboard, which naturally conforms to the index finger when playing barre chords. A flatter, larger radius is often preferred for clean single-note runs but can feel less organic for basic open chords.
Finally, the material and thickness of the strings themselves dictate the overall tension of the instrument. Steel strings, standard on acoustic guitars, are kept under high tension to project a bright, loud sound. This high tension makes them physically harder to press down, especially for uncalloused fingertips. Nylon strings, used on classical guitars, operate under much lower tension and have a softer, more forgiving texture. However, the physical construction of the guitars that house these strings introduces other playability trade-offs that beginners must carefully weigh.
Core Specifications to Evaluate When Choosing a Beginner Guitar
When shopping for a beginner guitar, relying on visual appeal alone can lead to frustration. Instead, you should evaluate several key physical specifications that directly impact how easy the instrument will be to play out of the box.

First, pay close attention to the nut width and scale length. The nut is the slotted piece of material at the top of the neck where the strings guide into the tuning pegs. The nut width determines how far apart the strings are spaced from one another. A standard steel-string acoustic guitar typically features a nut width of 43mm. For players with smaller hands or shorter fingers, a narrower nut width (such as 42mm) makes it much easier to reach across the fretboard to press complex chord shapes without accidentally muting adjacent strings. Scale length—the distance between the nut and the bridge saddle—also directly affects string tension. Shorter scale lengths (such as 24 inches or 24.75 inches) require less tension to tune the strings to pitch, resulting in a looser, softer feel under your fingers compared to a standard 25.5-inch scale.
Second, understand that factory action standards are rarely permanent. While manufacturers set target string heights during production, wood is a natural material that reacts to changes in temperature and humidity during shipping and storage. A guitar that left the factory with excellent action may arrive at a local shop or your home with a bowed neck and high strings. When evaluating a guitar, do not assume the action you feel in the store is the best the instrument can do, but do look for brands that prioritize consistent quality control and stable neck construction.
Third, consider the overall body size of the guitar. Large, traditional dreadnought guitars have deep, wide bodies that force your strumming arm high and forward. This awkward posture can cause you to lean over the instrument, which in turn forces your fretting wrist into a bent, strained angle. Choosing a smaller body shape, such as a Concert, Grand Concert, Parlor, or 3/4-size travel guitar, allows the instrument to sit closer to your body. This improved posture naturally aligns your fretting hand, making it significantly easier to apply clean, vertical pressure to the strings.
The Role of a Professional Setup in Lowering String Action
Many beginners make the mistake of assuming that if a brand-new guitar is difficult to play, they simply lack the talent or strength to continue. In reality, almost every guitar—from budget-friendly entry-level models to high-end professional instruments—benefits from a professional setup to achieve its optimal playability.
You can identify if your guitar’s action is too high through a few simple physical and visual checks. If you experience extreme finger pain within just a few minutes of practice, or if your chords sound out of tune even after you have carefully tuned the open strings, your action is likely too high. High action forces you to stretch the string down so far to meet the fret that you inadvertently bend the note sharp, ruining your intonation. Visually, if the gap between the strings and the frets at the 12th fret looks wider than the thickness of a standard individual coin (roughly 2mm to 2.5mm for the low E string), there is significant room for improvement.
A professional guitar technician or luthier performs a setup by adjusting three critical areas of the instrument:
- The Truss Rod: This metal rod runs inside the neck and controls its curvature (relief). Adjusting the truss rod ensures the neck has just the right amount of bow to prevent fret buzz while keeping the strings as close to the frets as possible.
- The Nut Slots: If the slots in the nut are too shallow, the strings will sit too high near the headstock, making first-fret chords like F major or B minor incredibly difficult to press. A technician will use specialized gauged files to carefully lower these slots.
- The Bridge Saddle: By sanding down the bottom of the saddle (the plastic or bone strip on the bridge), the technician lowers the string height across the middle and upper portions of the fretboard.
While minor truss rod adjustments can sometimes be performed at home with the correct hex wrench, you should stop DIY adjustments and consult a professional when it comes to filing nut slots or sanding saddles. Without specialized tools and experience, it is incredibly easy to file a slot too deep or sand a saddle unevenly. This causes permanent, severe fret buzz that can only be fixed by completely replacing the damaged components, turning a simple adjustment into an expensive repair. A professional setup is a highly accessible service that completely transforms a stiff, painful instrument into a joy to play.
Evaluating Guitar Chord Pressers and Finger Protectors
In your search for ways to make chord pressing easier, you will likely encounter various physical aids advertised online, such as mechanical guitar chord pressers and silicone finger protectors. While these accessories promise a shortcut to pain-free playing, it is essential to understand their limitations and long-term trade-offs before relying on them.
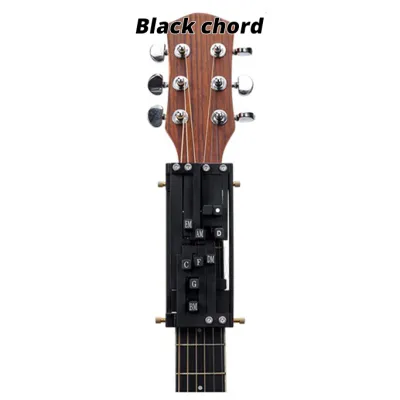
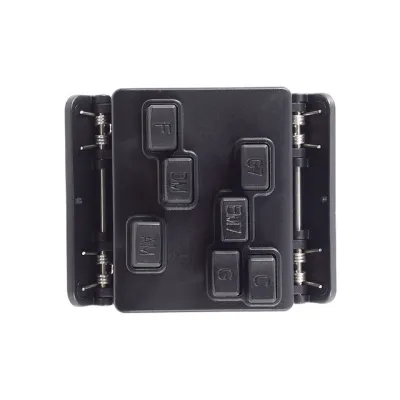
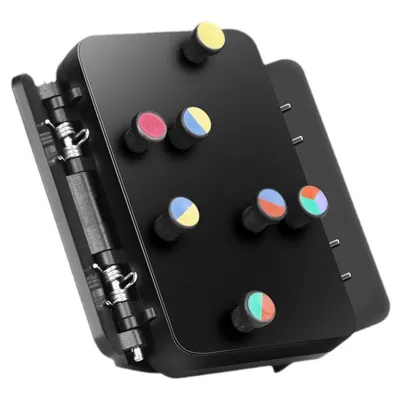
A mechanical guitar chord presser is a device that clamps directly onto the neck of the guitar. It features color-coded buttons that, when pressed, push down multiple strings simultaneously to form basic chords like G, C, D, and E minor. Silicone finger protectors, on the other hand, are small, textured caps that slip over your fingertips to shield them from the sharp bite of steel strings.
These tools do offer clear, immediate benefits under specific conditions. For individuals with severe physical limitations, such as arthritis, joint pain, or hand injuries, a mechanical chord presser can make the difference between being able to enjoy music and not playing at all. Similarly, finger protectors can provide temporary relief during the very first week of practice when fingertips are highly sensitive.
However, for the vast majority of aspiring players, these aids introduce significant long-term drawbacks:
- Hindered Callus Development: Your body naturally adapts to playing guitar by forming thin, protective calluses on your fingertips. Using silicone caps prevents this natural adaptation, meaning your fingers will remain sensitive indefinitely whenever you try to play without them.
- Lack of Muscle Memory: A mechanical presser bypasses the need to learn precise finger placement. You do not build the muscle memory required to transition between chords smoothly or to play anything outside of the pre-configured buttons.
- Muting and Precision Issues: Mechanical devices lack the organic flexibility of human fingers. They cannot adjust their angle to avoid touching adjacent strings, often resulting in muffled notes. They also make it impossible to perform essential guitar techniques like hammer-ons, pull-offs, slides, or string bending.
Ultimately, while physical aids can serve as a temporary bridge or an accessibility tool, they are not a substitute for a well-adjusted instrument. Investing in a proper professional setup, choosing a guitar with comfortable specifications, and practicing in short, consistent daily sessions remains the most effective and rewarding path to mastering the guitar.
Frequently Asked Questions (FAQ)
Can I use lighter strings to make my current guitar easier to press?
Yes, switching to a lighter gauge of strings is one of the easiest and most effective ways to reduce string tension on your current guitar. For an acoustic guitar, switching from standard light strings (typically .012 gauge) to extra-light strings (such as .010 or .011 gauge) significantly reduces the physical force required to press the strings down to the frets. However, because lighter strings exert less pull on the guitar neck, the neck may straighten or bow backward slightly. This change in tension can cause fret buzz, meaning you may need a minor truss rod adjustment to maintain clean playability after changing string gauges.
Is a classical nylon-string guitar easier for beginners to press than a steel-string acoustic?
Nylon strings are physically much softer and operate under significantly lower tension than steel strings, making them much gentler on beginner fingertips and easier to press down. However, classical guitars feature a much wider neck (often 50mm to 52mm at the nut) and a completely flat fretboard. This wide spacing requires your fingers to stretch much further to form standard chord shapes. If you have smaller hands, the physical stretch required by a classical guitar neck can offset the comfort benefits of the softer nylon strings.
How do I know if my guitar's nut slots are cut too high?
You can perform a simple, tool-free check to see if your nut slots are too high. Press any string down firmly at the third fret (between the second and third fret wires). While holding the string down, look closely at the gap between the bottom of the string and the top of the first fret wire. The gap should be incredibly small—barely visible, roughly the thickness of a piece of paper. If there is a distinct, wide gap, your nut slots are cut too high, which makes pressing open chords near the headstock unnecessarily difficult. Avoid attempting to file these slots yourself without specialized gauged files, as over-filing will cause permanent fret buzz.

Community discussion
Share your experience or ask a question. Comments are reviewed before publication.