
Setting up a home music practice room in a Singapore HDB flat or condominium presents a unique set of acoustic challenges. Because residential units here are typically constructed with dense concrete walls and tiled or vinyl floors, sound waves bounce aggressively off these hard surfaces, creating harsh echoes, flutter noise, and a muddy audio environment. Choosing the right acoustic foam panels is the most practical way to control these internal reflections, allowing you to hear the true tone of your instrument or vocals. To achieve the best results, you must select foam with the appropriate thickness and density for your specific instrument, plan a targeted layout that covers key reflection points, and use installation methods that protect your walls from damage.
Clarifying the Goal: Sound Absorption vs. Soundproofing
One of the most common mistakes when setting up a residential practice space is confusing sound absorption with soundproofing. Acoustic foam is designed solely for sound absorption. When sound waves strike the open-cell structure of the foam, the physical energy of the wave is converted into low-grade heat through friction. This process reduces the amount of sound bouncing back into the room, which eliminates flutter echoes, tightens the stereo image of studio monitors, and prevents your instrument from sounding overly harsh or boisterous within the space.
Soundproofing, on the other hand, is the process of blocking sound from entering or leaving a room entirely. To prevent your neighbors in adjacent HDB or condo units from hearing your music, you must stop sound vibrations from traveling through the building’s physical structure. This requires high-mass materials, structural decoupling, and complete airtight sealing. Because acoustic foam is incredibly lightweight and porous, it lacks the physical mass required to block sound transmission; it will not stop sound from escaping through your walls, windows, or doors.
Products mentioned in this guide
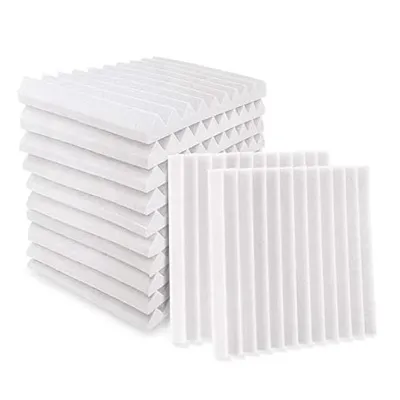
Prices are valid at publication and may change. Please refer to the product page for the latest price.
To achieve true isolation, a room requires heavy construction interventions, such as building a “room within a room” using double layers of drywall separated by resilient channels, installing heavy acoustic mineral wool inside wall cavities, and sealing every air gap with acoustic sealant. Understanding this distinction helps you set realistic expectations. Installing foam panels will dramatically improve how your music sounds to you inside the room, but it will not allow you to play a drum kit or a brass instrument at midnight without disturbing your neighbors.
Key Features to Look for in Acoustic Foam
Thickness and Density
The physical dimensions of your acoustic foam directly dictate which frequencies it can successfully absorb. Thinner panels, such as those measuring 1 inch (approximately 2.5 cm) in thickness, are highly efficient at absorbing high-frequency sound waves, which are responsible for high-pitched flutter echoes. However, they are virtually useless against lower frequencies. If you practice instruments with broader frequency ranges, such as acoustic guitars, keyboards, or vocals, you will need panels that are at least 2 to 3 inches thick to absorb the lower-midrange frequencies that cause room muddiness.

Density is another critical specification that determines performance and long-term durability. High-quality acoustic foam typically features a higher density, which means there are more microscopic cell walls per cubic meter to resist and absorb sound energy. When shopping for foam, look for the manufacturer’s density rating, often expressed in kilograms per cubic meter (kg/m³). Higher-density foam not only performs more consistently across its rated frequency spectrum but is also far less likely to crumble or lose its shape over time.
Rather than relying on vague marketing claims of professional-grade performance, check the product specifications for a verified Noise Reduction Coefficient (NRC) rating. The NRC is a standard rating scale from 0.0 (perfect reflection) to 1.0 (perfect absorption). A high-quality 2-inch polyurethane foam panel should ideally feature an NRC rating of 0.70 or higher, meaning it absorbs 70% or more of the sound energy striking it across a standardized range of frequencies.
Shape and Surface Profile
Acoustic foam is cut into various surface profiles, with wedge, pyramid, and egg crate designs being the most common. These shapes are not purely cosmetic; they are designed to increase the overall surface area of the panel, allowing more sound waves to strike the foam at different angles. Wedge profiles are highly popular because they can be alternated horizontally and vertically to handle reflections from multiple directions, while pyramid shapes offer a slightly more balanced scattering effect across the room.
While these profiles alter how high frequencies are scattered, their overall absorption capacity remains heavily dependent on the underlying thickness and density of the foam material itself. For example, a 2-inch pyramid panel actually contains slightly less physical foam mass than a solid, flat 2-inch panel of the same density because of the material carved away to create the pyramid shapes.
When planning your practice room, you should select a profile that aligns with your aesthetic preferences and budget. Wedge and pyramid shapes are excellent for a classic studio look and targeted reflection control, while egg crate designs are often more budget-friendly and highly suitable for general-purpose practice spaces where extreme precision is not required.
Fire Retardancy and Material Safety
In high-density residential buildings like HDB flats and condominiums, safety must be your absolute priority. Polyurethane foam is naturally highly flammable unless it has been chemically treated during manufacturing. Cheap, uncertified foam panels sourced from generic online marketplaces often lack fire-retardant properties, presenting a severe hazard if a fire breaks out in an enclosed bedroom or studio space.
Before purchasing any foam products, verify the manufacturer’s labels and product documentation for certified fire safety standards. Look for recognized classifications such as Class A fire ratings, ASTM E84 compliance, or local fire safety certifications. These ratings indicate that the foam has been tested for flame spread and smoke development, ensuring it will self-extinguish or burn at a significantly slower rate if exposed to heat or flame.
Additionally, check for low-VOC (Volatile Organic Compounds) emission certifications, such as CertiPUR-US or equivalent international standards. Poorly manufactured foam can off-gas harmful chemicals and synthetic odors, which can quickly degrade the indoor air quality of a small, closed practice room. Choosing certified, low-emission foam ensures that your practice environment remains safe and healthy during long, intensive rehearsal sessions.
Planning Your Layout for Small Spaces
To optimize a small HDB bedroom or condo study for music practice, you must strategically place your foam panels rather than covering the walls randomly. The most effective approach is to target the primary reflection points. These are the specific areas on your walls where sound waves travel directly from your instrument or studio monitors, bounce off the hard surface, and strike your ears.
You can easily identify these zones using the “mirror trick.” Sit in your primary playing or listening position while a friend slides a small mirror flat against the left and right side walls at eye level. Wherever you can see the reflection of your studio monitors or your instrument in the mirror, mark that spot with a piece of painter’s tape; this is a primary reflection point that requires foam coverage.
Avoid the temptation to cover every square inch of your walls with foam. Over-treating a small room can absorb too much high-frequency energy while leaving low-frequency muddy sounds untouched, resulting in an unnaturally “dead,” claustrophobic, and fatiguing acoustic environment. For a standard residential room, aim for a starting coverage of 20% to 30% of the total wall surface area, focusing your panels on the wall directly behind your monitors, the primary reflection points on the side walls, and the wall directly behind your sitting position.
Small, square HDB rooms are highly prone to low-frequency acoustic issues known as standing waves, which cause bass frequencies to build up and boom uncontrollably in the corners of the room. Because standard flat wall panels are too thin to absorb these long, powerful bass waves, adding more wall foam will not solve this issue. Instead, you should install specialized, thick corner bass traps in the vertical corners of your room to absorb low-end energy, while leaving some bare wall space or using plastic diffusers on the rear walls to maintain a natural sense of space and liveliness.
Installation Methods for Renters and Owners
Because many musicians rent their homes or wish to preserve their property’s resale value, installing acoustic foam without damaging the underlying walls is a major consideration. HDB and condo walls are typically finished with plaster and emulsion paint, which can easily peel or tear if you use permanent adhesives.
For a completely non-destructive installation, renters can use heavy-duty removable adhesive strips or specialized double-sided acoustic tape. However, because acoustic foam is highly porous, adhesive strips often struggle to stick directly to the back of the foam. To overcome this, you can apply a small piece of painter’s tape to the back of the foam panel, apply hot glue or spray adhesive to the painter’s tape, and then mount the removable adhesive strip onto that prepared surface.
Alternatively, you can use a highly effective hybrid mounting method. This involves gluing your foam panels onto lightweight backing materials, such as corrugated plastic sheets (coroplast), thin MDF boards, or canvas frames, using a dedicated heavy-duty spray adhesive. Once the foam is securely bonded to the lightweight backing board, you can hang the entire assembly on the wall using standard, damage-free picture hangers, utility hooks, or French cleats. This method creates a clean, professional look and allows you to easily take your acoustic treatment with you if you move house.
Never apply strong liquid construction glues, heavy-duty mounting tape, or permanent spray adhesives directly to your painted drywall or plaster walls. When the time comes to remove the foam, these aggressive adhesives will tear away the paint layers and the underlying plaster, resulting in costly wall repairs. Before applying any adhesive, always wipe down the wall surface with a dry microfiber cloth to remove dust, grease, and moisture, ensuring a secure and lasting bond.
Maintenance and Humidity Considerations
Singapore’s tropical climate presents a unique challenge for acoustic foam maintenance. With average relative humidity levels regularly exceeding 80%, open-cell polyurethane foam can act like a sponge, absorbing airborne moisture and trapping dust particles. Over time, this combination of moisture and dust can lead to hydrolytic degradation, a process where the polymer chains in the foam break down, causing the material to become sticky, lose its elasticity, and eventually crumble into fine dust.
To prolong the lifespan of your panels, establish a regular cleaning routine. Use a vacuum cleaner equipped with a soft brush attachment on a low suction setting to gently draw out accumulated dust from the deep crevices of the foam. Alternatively, a standard lint roller can be used to lift surface dust and pet hair. Never use water, liquid detergents, or wet cloths to clean your acoustic foam; introducing moisture directly into the open-cell structure will accelerate physical degradation and promote the growth of mold and mildew.
Additionally, try to position your foam panels away from windows that receive direct, intense afternoon sunlight. Ultraviolet (UV) radiation accelerates the oxidation of polyurethane, causing white or light-colored foam to rapidly turn yellow and become brittle. Keeping your curtains or blinds drawn during peak sunlight hours will help preserve both the color and structural integrity of your treatment.
Managing the overall environment of your practice room is the most effective way to protect your investment. Running an air conditioner or a dedicated dehumidifier in your practice room helps maintain a stable indoor relative humidity level of around 50% to 60%. This controlled environment not only prevents your acoustic foam from degrading prematurely but also protects your sensitive musical instruments, such as wooden acoustic guitars, violins, and electronic gear, from moisture-related damage.
Frequently Asked Questions (FAQ)
Will acoustic foam stop my neighbors from hearing my instrument?
No, acoustic foam will not stop your neighbors from hearing your instrument. Acoustic foam is designed for sound absorption, which means it reduces echoes and improves sound quality inside your room, but it lacks the heavy mass and density required to block sound from traveling through concrete walls, floors, and ceilings. To reduce the amount of sound escaping your room, you should combine your foam panels with isolation measures such as installing dense rubber draft stoppers on your door, hanging heavy acoustic curtains over windows, placing thick rugs with dense underlays on hard floors, or practicing with electronic instruments and headphones during late-night hours.
How many foam panels do I need for a typical HDB bedroom?
The exact number of panels you need depends on your room’s dimensions, the instrument you play, and your personal acoustic preferences. For a standard Singapore HDB bedroom measuring roughly 3 meters by 3 meters, a common and effective starting point is 12 to 18 standard-sized panels (typically 12×12 inches or 30×30 cm). This quantity allows you to treat your primary reflection points on the side walls and place a small cluster of panels on the wall directly behind your playing position or studio monitors. It is highly recommended to start with this baseline coverage and conduct critical listening tests before deciding to purchase and install additional panels.
Community discussion
Share your experience or ask a question. Comments are reviewed before publication.