
Choosing the right sound insulation foam depends entirely on the specific frequencies your instrument produces and whether you need to block sound or improve how it sounds inside the room. Many musicians start their acoustic journey looking for “sound insulation foam” to stop sound from escaping their practice space, only to find that standard acoustic foam does not block sound. Instead, acoustic foam is designed to absorb sound waves within a room, preventing echoes and reflections from muddying your recordings or practice sessions.
To get the most out of your investment, you must match the foam’s physical characteristics—such as its profile, thickness, and density—to the unique acoustic footprint of your instrument. Whether you are tracking delicate vocals, taming a loud guitar amplifier, or managing the powerful low-end of a drum kit, understanding how sound interacts with porous materials will help you create a balanced, professional-sounding environment.
Soundproofing vs. Acoustic Treatment: What Foam Can Actually Do
To build an effective music space, you must first understand the difference between sound isolation (soundproofing) and sound absorption (acoustic treatment). Soundproofing is the process of stopping sound from entering or leaving a room. This requires heavy, dense materials that block sound waves, along with structural decoupling to prevent vibrations from traveling through walls, floors, and ceilings. If you are trying to prevent neighbors in a close-built residential area from hearing your late-night practice, relying solely on foam panels will lead to disappointing results.
Products mentioned in this guide

Prices are valid at publication and may change. Please refer to the product page for the latest price.
Acoustic foam, on the other hand, is an absorption tool. It features an open-cell structure that allows sound waves to penetrate the material. As the sound waves pass through the maze of tiny, interconnected pores, friction converts the acoustic energy into trace amounts of heat. This process prevents the sound from bouncing back off hard walls, which eliminates flutter echoes, reduces overall room reverberation, and clarifies the sound of your instrument.
When planning your space, use acoustic foam to improve the internal sound quality of your room. It is the correct solution for removing the boxy, hollow sound of small rooms, making your recorded tracks sound cleaner and more professional. For true soundproofing, you must combine these absorption panels with heavy construction materials, such as mass-loaded vinyl, double-layered drywall, or specialized acoustic insulation wool inside the wall cavities.
Matching Foam Profiles and Densities to Your Instruments
Different instruments produce different sound frequencies, meaning a one-size-fits-all approach to acoustic foam will not work. You must select foam profiles and densities that correspond to the frequency range of your specific instrument.

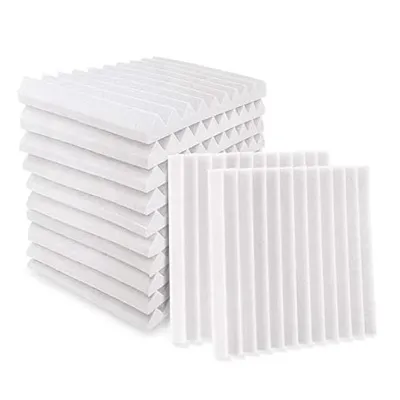
Vocals and acoustic guitars primarily produce mid-to-high frequency sounds. These frequencies have relatively short wavelengths, making them easy to manage with standard acoustic foam. For these applications, wedge or pyramid foam profiles are highly effective. The sculpted surfaces of these panels increase the overall surface area of the foam, allowing them to scatter and absorb high-frequency reflections more efficiently. A standard two-inch thickness is generally sufficient to tame flutter echoes and clarify vocal takes without stripping away the natural warmth of an acoustic guitar.
Drum kits and bass amplifiers present a much greater acoustic challenge. Low-frequency sound waves are long, powerful, and tend to accumulate in the corners of a room, creating a muddy, boomy buildup that drowns out mid-range detail. Standard thin foam panels are virtually invisible to these long wavelengths. To manage low-end buildup, you need high-density foam panels or dedicated corner bass traps. Bass traps are thick, triangular blocks of foam designed to fit snugly into room corners, where low-frequency pressure is highest. When purchasing, check the manufacturer’s density specifications; denser foam is required to absorb low-frequency energy effectively.
Electric guitar amplifiers produce highly directional, mid-range frequencies that can easily overwhelm a small room. Rather than covering every wall with foam, you can manage these reflections using targeted panel placement. Placing flat or wedge-profile foam panels directly behind the amplifier and on the wall opposite the speaker cabinet will absorb the direct blast of sound, preventing harsh mid-range reflections from bouncing back into your recording microphone.
Determining Thickness, Coverage, and Placement Strategies
Selecting the right foam is only half the battle; you must also determine how much foam you need and where to place it. A common mistake is covering every square inch of wall space, which over-dampens the room and creates an unnatural, lifeless environment.
To determine the necessary thickness, cross-reference your instrument’s fundamental frequencies with the manufacturer’s absorption data, often represented as a Noise Reduction Coefficient (NRC). An NRC rating ranges from 0 (no absorption) to 1 (complete absorption). For high-frequency instruments, one-inch or two-inch panels are suitable. For instruments with significant low-mid or low-frequency output, look for panels that are three to four inches thick, as thicker foam can absorb lower frequencies.
Instead of full coverage, aim for strategic placement covering roughly 30% to 50% of your wall surface. Start by treating the primary reflection points. These are the specific areas on your walls where sound travels directly from your instrument or speakers, bounces off, and reaches your ears or microphone. You can find these points easily using the “mirror trick”: sit in your main listening position while a friend slides a small mirror along the wall at eye level. Wherever you see the reflection of your instrument or speakers in the mirror, mark that spot—that is a primary reflection point where a foam panel should be placed.
Additionally, stagger your panels on opposite walls. If you place a panel on one wall, leave the corresponding space on the opposite wall bare. This breaks up parallel reflective surfaces, preventing standing waves and flutter echoes while keeping some natural airiness in the room.
Safety Standards, Installation, and Long-Term Care
When installing acoustic foam in an enclosed studio or practice room, safety and maintenance should be top priorities. Because acoustic foam is made of polyurethane, it can present a significant fire hazard if it is not treated with fire-retardant chemicals.
Before purchasing any foam products, verify their fire safety certifications on the product packaging or manufacturer’s specification sheets. In Singapore, residential and commercial buildings must comply with strict fire safety regulations. Look for foam that meets recognized international standards, such as Class A or Class 1 fire ratings, which indicate that the material has been treated to resist ignition and slow down the spread of flames. Avoid cheap, unbranded foam that does not explicitly state its fire-retardant properties.
If you are renting your practice space or want to protect your walls from damage, avoid applying heavy construction adhesives directly to the drywall. Removing glued-on foam later will tear the paper backing of the drywall, leading to costly repairs. Instead, mount your foam panels onto lightweight backing boards, such as coroplast or thin plywood sheets, using spray adhesive. You can then hang these boards on the wall using non-destructive adhesive strips, picture-hanging hooks, or impaling clips. This method allows you to move or reposition your acoustic treatment easily without leaving a trace.
To keep your acoustic foam performing well over the long term, establish a gentle cleaning routine. The open-cell structure of the foam naturally collects dust, which can clog the pores and reduce its absorption efficiency over time. Use a vacuum cleaner with a soft brush attachment on its lowest suction setting to gently sweep the surface of the panels. Avoid using water, liquid detergents, or harsh chemical sprays, as moisture trapped inside the open cells can lead to mold growth and accelerate the physical breakdown of the polyurethane material. Keep the foam out of direct sunlight, as ultraviolet rays will cause the material to discolor and crumble prematurely.
Frequently Asked Questions (FAQ)
Can regular packaging foam work as a substitute for studio acoustic foam?
No, packaging foam is not a suitable substitute. Packaging foam is typically made of closed-cell structures designed to absorb physical impacts, which reflects sound rather than absorbing it. Even open-cell packaging foam lacks the consistent density and engineered pore structure required for predictable acoustic performance. Furthermore, packaging foam rarely contains fire-retardant additives, making it a significant fire hazard if applied to walls.
How do I clean acoustic foam without damaging its porous structure?
To clean acoustic foam safely, use dry methods to protect its delicate open-cell structure. Lightly vacuum the surface using a soft brush attachment, or use a can of compressed air to blow dust out of the crevices. Never use harsh chemical solvents, saturate the foam with water, or scrub it aggressively. If a panel becomes stained, gently spot-clean it with a slightly damp cloth and allow it to air-dry completely in a well-ventilated area.
Community discussion
Share your experience or ask a question. Comments are reviewed before publication.