
Choosing your first guitar processor can feel overwhelming, but finding the right M-Vave multi-effects pedal comes down to understanding your practice environment, your budget, and how you plan to listen to your playing. For beginner guitarists, the ideal entry-point device must balance realistic amplifier tones with straightforward controls, avoiding the paralyzing complexity of high-end professional rigs. By matching the physical form factor of the pedal to your daily practice habits, you can establish a highly effective, low-friction setup that encourages you to pick up your guitar every single day.
In Singapore’s high-density housing environments, where silent practice is often a necessity rather than a preference, these compact devices offer an incredibly practical solution. They allow you to access a vast library of classic guitar tones through a simple pair of headphones, keeping your neighbors happy while providing a rich, inspiring sound. Whether you are practicing in a compact bedroom, setting up a dedicated desktop recording corner, or preparing to jam with friends, selecting the correct configuration ensures you do not waste money on features you do not yet need.
Why M-Vave Appeals to Beginner Guitarists
For those taking their first steps into the world of electric guitar, the market positioning of M-Vave (historically known to many musicians as Cuvave) represents an exceptionally accessible entry point. Traditional multi-effects processors from premium brands often carry premium price tags, which can be a significant financial barrier for someone who is still deciding if the guitar will remain a lifelong hobby. M-Vave addresses this by offering highly affordable units that compress essential processing power into compact, budget-friendly formats, typically priced well under S$100.
Products mentioned in this guide
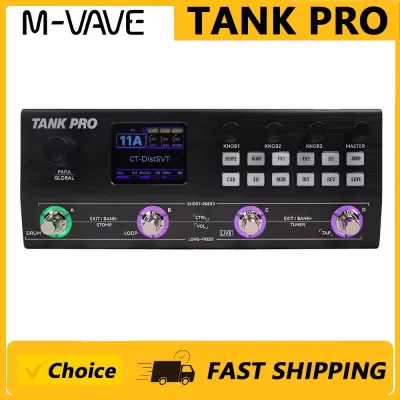
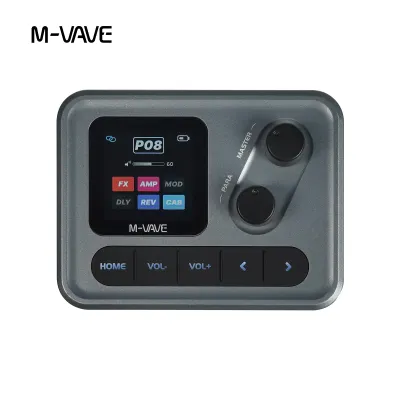
Prices are valid at publication and may change. Please refer to the product page for the latest price.
Despite their modest pricing, these units do not compromise on the fundamental tools a beginner needs to build a solid foundation. They combine digital amp modeling, cabinet simulations, and a suite of core modulation, delay, and reverb effects into a single housing. Many models also include integrated drum machines or metronomes, allowing you to practice timing and rhythm without needing to manage multiple external devices or apps. This all-in-one approach minimizes setup friction, allowing you to focus your energy entirely on learning chords, scales, and songs.
However, keeping your expectations realistic is vital when investing in entry-level gear. While these pedals offer outstanding value for bedroom practice, home recording, and casual learning, they are not designed to compete with professional-grade touring processors. The physical chassis of budget pedals often utilizes lightweight plastics or thin metals that may not withstand the rigors of heavy live gigging. Furthermore, the internal digital signal processing (DSP) limits complex routing options and high-definition studio integration, meaning these units are stepping stones rather than permanent fixtures for advanced stage work.
Core Features to Prioritize for Your Skill Level
When navigating the specifications of different multi-effects units, it is easy to get distracted by flashy numbers, such as having hundreds of onboard effects. For a beginner, a massive library of obscure modulation effects is rarely useful and often leads to endless tweaking instead of productive practicing. Instead, you should focus your attention on several core features that directly impact your tone quality and learning efficiency.

Amp Modeling and Cabinet Simulation
The heart of any multi-effects processor is its ability to replicate the sound of classic guitar amplifiers and speaker cabinets. A high-quality clean tone, a touch of organic blues crunch, and a tight, high-gain distortion are far more valuable than dozens of unusable synth or filter effects. Look for units that offer clear, responsive amp models that react naturally to your guitar’s volume knob and your picking dynamics, as this feedback is crucial for developing proper playing techniques.
Impulse Response (IR) Support
An Impulse Response (IR) is a digital snapshot of a specific speaker cabinet, microphone, and room acoustic profile. In budget multi-effects units, the built-in cabinet simulations can sometimes sound flat or sterile. Choosing a model that supports third-party IR loading is one of the best ways to future-proof your purchase. This feature allows you to download free or premium cabinet profiles from the internet and load them onto your pedal via USB, instantly elevating a budget processor to sound like it is running through a professional, high-end guitar cabinet.
Essential Connectivity Options
Your pedal must integrate smoothly with your existing playback gear. Prioritize units that offer the following physical and wireless connections:
- Headphone Output (3.5mm or 1/4-inch): Essential for late-night practice sessions in quiet households.
- Auxiliary Input or Bluetooth Audio: Allows you to stream backing tracks, metronomes, or video lessons directly from your smartphone through the pedal, mixing the audio seamlessly with your guitar signal.
- USB Audio Interface Functionality: Enables you to connect the pedal directly to a computer or mobile device to record your playing into a Digital Audio Workstation (DAW) without needing a separate audio interface.
Intuitively Designed User Interface
A complicated interface with deep, nested menus on a tiny screen can quickly kill your creative drive. For beginners, a simple layout featuring physical knobs for gain, tone, and volume is highly recommended. If the pedal relies on digital editing, ensure it features a well-designed companion mobile app or desktop editor. Being able to adjust your sound quickly via a clear graphical interface on your phone makes tone creation an enjoyable, educational process rather than a frustrating chore.
Matching M-Vave Form Factors to Your Practice Environment
Your physical practice setup dictates which style of pedal will serve you best. M-Vave designs its product lineup across several distinct form factors, each tailored to a specific style of use. By identifying where you will play most often, you can select a physical design that fits naturally into your lifestyle.
Desktop and Portable Practice Units
Desktop units are designed to sit flat on a table, desk, or shelf, placing all physical controls within easy arm’s reach. They are ideal for players who spend their practice time sitting in front of a computer, following online video tutorials, or recording basic tracks.
- Primary Benefits: These units eliminate the need to bend down to adjust settings, making tone tweaking incredibly convenient. Many desktop-style processors feature highly visible screens and intuitive physical dials, making them excellent educational tools for learning how different effects interact.
- What to Verify: Before purchasing a desktop unit, check its power requirements to ensure it can be powered easily via USB from your computer or a standard USB wall charger. If the unit features small built-in speakers, verify their wattage to ensure they can deliver clear audio at low volumes without distorting or sounding boxy.
Floor-Based Multi-Effects Boards
Floor-based units are the traditional format for guitar effects, featuring foot-activated switches and, in many cases, an integrated expression pedal. This setup is perfect for players who want to simulate a traditional pedalboard experience.
- Primary Benefits: A floor unit allows you to practice switching effects on and off while standing up, which is essential for building the muscle memory required for live performances or jamming with a band. The inclusion of an expression pedal opens up opportunities to learn classic techniques like wah-wah, volume swells, and real-time pitch shifting.
- What to Verify: Examine the material of the footswitches and the overall chassis. Metal switches offer significantly better long-term durability than plastic alternatives. Additionally, confirm whether the unit has a dedicated calibration setting for the expression pedal to ensure smooth, predictable control over your volume or effects sweeps.
Pocket-Sized and Headphone Amp Processors
Pocket-sized processors and plug-style headphone amplifiers represent the ultimate in portability. These ultra-compact devices often plug directly into your guitar’s output jack, requiring nothing more than a pair of headphones to function.
- Primary Benefits: These devices take up virtually no physical space, making them perfect for those living in cozy apartments or for guitarists who travel frequently. They run on internal rechargeable batteries, eliminating cable clutter entirely and allowing you to practice on the couch, in bed, or even outdoors.
- What to Verify: Pay close attention to the rated battery life and charge times, ensuring the internal battery can easily handle your typical practice sessions. Check the Bluetooth specifications as well; while Bluetooth is excellent for streaming backing tracks, verify that the audio transmission latency is low enough to prevent distracting delays between your backing track and your live guitar playing.
Essential Specifications to Verify Before Checkout
To avoid compatibility issues or accidental damage to your new gear, you must verify several technical specifications before finalizing your purchase. Taking a few minutes to confirm these details ensures a smooth setup process right out of the box.
Power Supply Requirements
Always check the exact power specifications of the unit you choose. While some highly portable M-Vave models utilize internal rechargeable lithium-ion batteries, larger floor and desktop units typically require an external power source.
- Voltage and Current: Most standard guitar pedals run on 9V DC power, but you must verify the required current draw (measured in milliamperes, or mA). An underpowered power supply can cause digital noise, glitches, or frequent restarts.
- Polarity: Ensure the power adapter matches the polarity of the pedal—most guitar gear uses a center-negative configuration, but using a center-positive adapter by mistake can permanently damage the internal circuitry. Always check the symbol on the pedal's power jack or consult the manual.
Audio Input and Output Routing
Verify that the physical jacks on the pedal match your listening equipment. Standard guitar amplifiers require a 1/4-inch (6.35mm) unbalanced TS cable. If you plan to output the sound directly to studio monitors, a PA system, or home stereo speakers, check if the pedal offers dedicated stereo outputs or if you will need specific adapter cables (such as a 1/4-inch to RCA or a 3.5mm TRS stereo splitter cable).
Software and Operating System Compatibility
Because budget multi-effects units often rely on external companion apps for advanced preset editing and loading third-party IRs, software compatibility is critical. Visit the manufacturer’s website or check mobile app stores to confirm that the editing software fully supports your specific operating system version, whether you use Windows, macOS, iOS, or Android.
Firmware Update Availability
Before purchasing, check online musician forums or the manufacturer’s support page to see if the model receives regular firmware updates. Manufacturers frequently release updates that resolve software bugs, improve DSP stability, optimize battery performance, or even add brand-new amplifier models and effects to the device for free.
Common Beginner Mistakes When Setting Up Multi-Effects
Getting a multi-effects pedal to sound great requires a basic understanding of signal routing and gain structure. Many beginners plug their new pedal in, find the sound muddy or harsh, and assume the pedal is defective. In most cases, a few simple adjustments can completely transform your tone.
Managing Gain Staging to Avoid Digital Clipping
Digital clipping occurs when the audio signal entering or leaving a digital processor is too hot, resulting in a harsh, crackling distortion that sounds highly unpleasant. To prevent this, you must manage your gain staging carefully. Keep your guitar’s volume control at a reasonable level, adjust the pedal’s internal patch volume so it matches the level of your clean bypass signal, and use your amplifier or headphone volume control—rather than the pedal’s internal digital gain—to adjust the final listening volume.
Understanding the Cabinet Simulation Toggle
One of the most common mistakes beginners make is running a cabinet simulation into a real guitar amplifier. If you are plugging your multi-effects pedal into the front input of a traditional guitar amplifier, you must turn off the pedal’s cabinet simulation or IR setting. A real guitar amplifier speaker is already voiced to shape guitar frequencies; running a simulated speaker cabinet into a physical speaker cabinet results in a dark, muffled, and muddy tone. Conversely, if you are listening through headphones, studio monitors, or a PA system, you must keep the cabinet simulation turned on to prevent the tone from sounding incredibly harsh, buzzy, and thin.
Avoiding the Trap of Overusing Effects
When you first gain access to dozens of digital effects, the temptation to use many of them simultaneously is incredibly strong. However, stacking high-gain distortion with heavy chorus, flanger, delay, and deep reverb usually results in a chaotic wash of noise where individual notes are completely lost. Start by building a clean, dry amplifier tone that sounds good on its own. Once you have a solid foundation, introduce a single effect—such as a subtle touch of reverb for space, or a light delay for depth—and learn how it shapes your sound before adding anything else.
Customizing Factory Presets to Your Instrument
Factory presets are typically programmed to sound dramatic and exciting in product demonstrations, often utilizing extreme EQ settings and excessive effects. These presets are rarely optimized for your specific guitar, pickups, or playing style. A preset designed for a bright, low-output single-coil pickup may sound incredibly muddy and distorted when played with a high-output humbucker. Do not hesitate to treat factory presets as rough starting points; use the pedal’s editing controls to back off the gain, adjust the EQ dials, and tailor the sound to match your unique instrument.
Frequently Asked Questions (FAQ)
Can I use a M-Vave multi-effects pedal directly with headphones?
Yes, almost all modern M-Vave multi-effects units are equipped with a dedicated headphone output, typically utilizing a standard 3.5mm (1/8-inch) jack. This built-in headphone amplifier allows you to practice silently without needing to connect the pedal to a traditional guitar amplifier.
To ensure optimal volume levels and audio clarity, verify the impedance of your headphones. Most consumer headphones, earbuds, and In-Ear Monitors (IEMs) feature low impedance (generally under 32 ohms) and can be driven easily by the pedal. However, high-impedance professional studio monitor headphones may sound quiet or lack dynamic range without an external headphone amplifier.
Do I need an external power supply for M-Vave pedals?
Whether you need an external power supply depends entirely on the specific model you choose. Several of M-Vave’s ultra-portable pocket units and compact floorboards feature built-in rechargeable lithium-ion batteries, which can be charged using a standard USB-C cable connected to a wall charger or computer port.
For models that do not include an internal battery, you will need an external power source. Most of these units require a standard 9V DC adapter. Before connecting any third-party power brick, check the user manual to confirm the exact voltage, current draw requirements, and polarity (usually center-negative) to prevent permanent electrical damage to the pedal’s internal components.
Is it better to buy a multi-effects pedal or individual pedals as a beginner?
For most beginner guitarists, a multi-effects pedal is a much more practical and cost-effective starting point than purchasing individual stompboxes. A single multi-effects unit provides access to a massive variety of amplifiers, cabinets, and effects at a fraction of the cost, allowing you to explore different musical genres and discover which sounds you enjoy most without a heavy financial commitment.
Individual pedals offer a highly tactile, simple interface and can deliver premium tone quality, but building a complete setup requires buying multiple separate units, patch cables, a dedicated pedalboard, and an isolated power supply. A multi-effects processor simplifies your physical setup, eliminates cable troubleshooting, and provides a streamlined, compact solution that is perfect for learning the fundamentals of guitar tone shaping.
Community discussion
Share your experience or ask a question. Comments are reviewed before publication.