
Installing a clip-on fine tuner on an Erhu is an excellent way to achieve precise pitch control without struggling with the traditional wooden tuning pegs. Unlike Western stringed instruments that rely on a tailpiece, the Erhu features a unique suspended string design that requires specialized hardware for micro-adjustments. By choosing a compatible clip-on model, such as the ammoon Erhu Clip Professional String Fine Tuner for Violin, you can easily clamp the device onto your strings to make minute tension adjustments. This guide provides a comprehensive, step-by-step walkthrough to help you safely install, adjust, and troubleshoot your clip-on fine tuner without risking damage to your instrument’s delicate snakeskin soundboard or strings.
Understanding Erhu String Structure and Tuner Compatibility
To understand how a clip-on fine tuner works, you must first look at the fundamental differences between the Erhu and Western stringed instruments like the violin. A violin secures its strings at the bottom using a tailpiece, where standard fine tuners are permanently slotted or built-in. The Erhu, however, has no tailpiece. Instead, its two strings—the inner D-string and the outer A-string—are anchored directly to a metal or wooden base pin at the bottom of the instrument’s sound box. From there, they run upward over a small wooden bridge, pass through a sliding string tie, and wrap around the upper wooden tuning pegs.
Because there is no tailpiece to anchor hardware, standard violin fine tuners cannot be mounted on an Erhu. This is where specialized clip-on fine tuners come into play. These compact metal devices are designed to clamp directly onto the strings in the open space between the wooden bridge and the bottom anchor pins. By gripping the strings securely, the tuner uses a small screw mechanism to push or pull against the string line, subtly altering the tension and shifting the pitch by fractions of a semitone.
Products mentioned in this guide
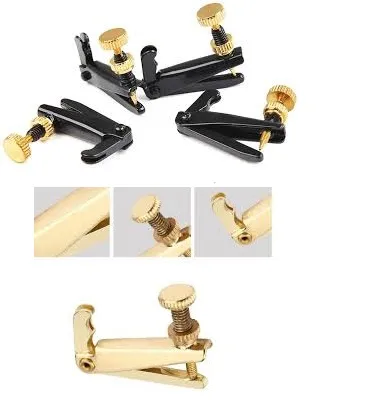
Prices are valid at publication and may change. Please refer to the product page for the latest price.
Before purchasing or installing a clip-on tuner, you must verify that the device is compatible with your specific strings. Erhu strings vary in thickness, core material, and winding type. Most modern Erhu strings feature a steel core wound with nylon or metal alloys, which provides the necessary structural strength to withstand the clamping force of a clip-on tuner. If you use very thin or purely synthetic strings without metal winding, you must check the manufacturer’s specifications to ensure the clip mechanism will not slip or slice through the outer layer of the string.
Tools and Preparation for Safe Installation
Before attempting to attach any hardware to your Erhu, gathering the correct tools and preparing your workspace is essential for preventing accidental damage. You will need your clip-on fine tuner, a reliable digital chromatic tuner to monitor pitch changes, and a clean, soft microfiber cloth to protect the instrument’s finish. Working on a flat, well-lit table covered with a soft towel will prevent the Erhu from sliding or getting scratched during the installation process.

Take a moment to inspect the condition of your Erhu strings before adding the extra weight and pressure of a clip-on tuner. Look closely at the areas near the wooden bridge and the bottom anchor pins for any signs of wear, rust, fraying, or unraveling metal winding. If the strings are old or show visible weak points, replace them before installing the tuner, as the clamping action of the clip can easily snap a compromised string.
If your strings are currently tuned to their standard pitches, it is wise to relieve some of the tension before installing the clip. Gently turn the main wooden tuning pegs to loosen the strings slightly. This reduction in tension makes it much easier to position the clip-on tuner without scratching the wood or putting sudden, uneven stress on the bridge and the delicate snakeskin membrane of the sound box.
Step-by-Step Installation Guide for Clip-On Tuners
The physical installation of a clip-on fine tuner requires a steady hand and careful alignment to ensure optimal performance and safety. The ideal placement zone for the tuner is on the section of the strings located below the wooden bridge and above the bottom base pins. This specific area provides enough leverage to alter string tension effectively without interfering with your bowing hand or the vibration of the bridge itself.
Begin by opening the clamping mechanism of your clip-on tuner. If you are using a model like the ammoon Erhu Clip Professional String Fine Tuner for Violin, you will notice a small screw that controls the grip width. Loosen this screw until the clamp is wide enough to slip over the target string. Carefully slide the clamp onto the string, positioning it roughly halfway between the bridge and the bottom pins, ensuring it does not touch the wooden bridge or the snakeskin soundboard.
Once the tuner is in position, gently tighten the clamping screw to secure the grip. The connection must be firm enough to prevent the tuner from sliding up or down when the string vibrates, but you must avoid overtightening. Applying excessive force can crush the delicate metal winding of the string or deform the steel core, leading to premature string failure or a muffled tone. Stop tightening as soon as you feel solid resistance and the tuner no longer moves when lightly touched.
After securing the clamp, verify the physical clearance of the tuner body. It is absolutely critical that no part of the metal tuner touches the snakeskin soundboard or the wooden body of the sound box. There should be a clear, visible gap between the tuner and the snakeskin at all times. Additionally, check that the tuner does not alter the natural angle of the strings as they pass over the bridge, as any lateral displacement can ruin your instrument’s intonation and tone quality.
If you are installing a dual-string setup with two separate fine tuners, repeat the entire process for the second string. Take extra care to maintain symmetrical clearance between both tuners. They should sit parallel to each other and have sufficient space between them so they do not rub or click against one another during play. Double-check that both clamping screws are tightened evenly and that both devices remain suspended safely above the snakeskin.
Adjusting the Fine Tuner for Accurate Pitch
With the clip-on tuner securely installed, you can begin the process of micro-adjusting your Erhu’s pitch. Turn on your digital chromatic tuner and place it nearby where you can easily see the display. Gently pluck or bow the string to check its current pitch. Because you loosened the strings slightly before installation, the pitch will likely be flat compared to the standard D4 and A4 tuning.
Use the main wooden tuning pegs to bring the strings back close to their target pitches. The wooden pegs are designed for coarse tuning, so aim to get within a quarter-tone of the correct pitch. Once you are close, press the wooden peg firmly into its pegbox hole to lock it in place, preventing it from slipping. From this point forward, you will use the clip-on fine tuner for all precise adjustments.
To raise the pitch of a string, slowly turn the fine adjustment screw on the clip-on tuner clockwise. This action increases the tension on the string segment below the bridge, raising the overall pitch. To lower the pitch, turn the screw counterclockwise. Always make these adjustments in small, controlled increments—such as a quarter-turn at a time—while continuously checking the digital tuner. Sudden, rapid turns can cause tension spikes that might snap the string or shift the bridge out of alignment.
After making your adjustments, verify the overall intonation and stability of the instrument. Play several open notes and basic scales to ensure the strings hold their pitch under the pressure of your bow. If you notice the pitch dropping quickly, check if the main wooden peg is slipping or if the clip-on tuner is sliding along the string. A properly adjusted setup should provide smooth, reliable micro-tuning that remains stable throughout your practice session.
Troubleshooting Buzzing and Installation Issues
One of the most common issues musicians encounter after installing a clip-on fine tuner is an unwanted buzzing or rattling sound when playing. This sympathetic vibration is almost always caused by a loose component on the tuner itself or physical contact between the tuner and another part of the Erhu. Check the adjustment screws to ensure they are not completely loose, and verify that the tuner body is not vibrating against the snakeskin membrane, the bridge, or the adjacent string.
If you find that the clip-on tuner is slipping down the string during play, the cause is usually a lack of friction on smooth or highly polished synthetic strings. To resolve this, you can check if the manufacturer provides specialized rubber or silicone padding for the clamp. Alternatively, you can reposition the grip slightly to a section of the string with more texture, or ensure the clamping screw is tightened just enough to bite securely without damaging the metal winding.
Always be prepared to stop and remove the tuner immediately if you observe any signs of physical damage or structural instability. If you notice visible deformation of the string, deep indentations on the snakeskin, or if the wooden bridge begins to tilt or shift from its central position, loosen the tuner and take it off. Continuing to play with an improperly fitted tuner can lead to costly repairs, such as a torn snakeskin soundboard or a cracked bridge.
Frequently Asked Questions (FAQ)
Can I use a standard violin tailpiece fine tuner on an Erhu?
No, standard violin tailpiece fine tuners are structurally incompatible with the Erhu. Violin tuners are designed to slot into the holes or hooks of a violin’s tailpiece, a component that the Erhu completely lacks. Attempting to force a tailpiece tuner onto an Erhu string will not work and can damage the instrument. You must use specialized clip-on tuners or base-mounted tuners designed specifically to grip the suspended strings of an Erhu.
Will the clip-on tuner damage the snakeskin membrane?
A properly installed clip-on tuner will not damage the snakeskin membrane, provided it remains completely suspended on the strings. The tuner must never rest on or touch the snakeskin, as the metal edges and constant vibration can easily puncture or wear down the delicate skin. You should perform regular visual checks before and after every playing session to ensure the tuner has not shifted downward or loosened over time.
Community discussion
Share your experience or ask a question. Comments are reviewed before publication.