
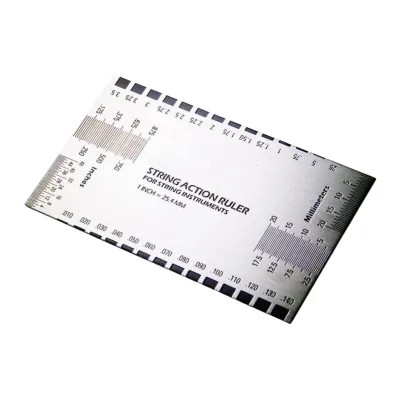
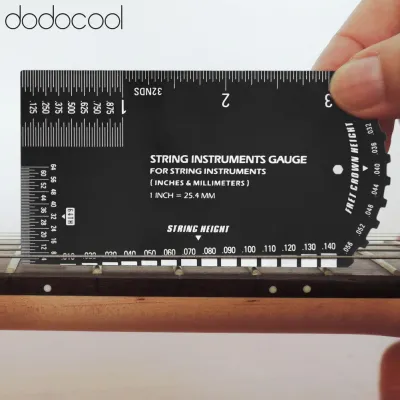
Using a guitar ruler to measure string action and neck relief is the foundation of a great instrument setup. This small, flat metal tool—often called a string action gauge—features precise markings that allow you to check the tiny clearances between your strings and frets. By taking accurate measurements, you can determine whether your guitar needs a truss rod adjustment to correct the neck bow or a bridge adjustment to raise or lower the strings. Regular measurements help you maintain consistent playability, eliminate unwanted fret buzz, and tailor your instrument to your specific playing style.
To get started, you will need to understand how these measurements interact, gather a few basic tools, and follow a systematic process. Measuring first ensures you do not make unnecessary adjustments that could worsen your guitar’s playability.
Understanding String Action and Neck Relief
Before adjusting any screws or saddles, you must understand the physical forces acting on your guitar. Neck relief refers to a slight forward bow engineered into the guitar neck. This subtle curve creates a shallow valley along the fretboard, giving the strings room to vibrate in an elliptical pattern when plucked. Without this relief, the vibrating strings would constantly strike the frets, causing persistent buzzing, especially on the lower frets.
Products mentioned in this guide



Prices are valid at publication and may change. Please refer to the product page for the latest price.
String action is the physical distance between the top of the fret wire and the bottom of the string. This measurement determines how much downward pressure your fingers must exert to fret a note. Low action makes the guitar feel soft and easy to play, but setting it too low can cause fret buzz and choke out bent notes. High action provides a cleaner tone with more dynamic range, but it requires greater hand strength and can pull notes sharp when fretted.
These two factors are deeply interconnected and must be addressed in a strict sequence. Adjusting the neck relief by turning the truss rod will inherently alter the string action. Conversely, adjusting the bridge height will not change the physical bow of the neck. Therefore, you must always measure and set the neck relief first before attempting to measure or adjust the string action.
It is also important to recognize that there is no single “perfect” measurement for every guitar. The ideal setup depends heavily on your playing style, string gauge, and instrument type. A heavy-handed blues player using thick strings on an acoustic guitar will require higher action and more relief than a light-touch player using thin strings on an electric guitar.
Tools and Preparation for Guitar Setup
To achieve accurate results, you must prepare your workspace and gather the correct tools. The primary tool you need is a specialized guitar ruler. Unlike standard rulers, a guitar ruler starts its measurement scale exactly at the physical edge of the tool, allowing you to rest it directly on the fret wire. It typically features both metric and imperial increments, often down to fractions of a millimeter or 64ths of an inch.

In addition to the guitar ruler, you will need a capo to assist with measuring neck relief. A capo acts as an extra hand, holding the strings down at the first fret while you take measurements further down the neck. For ultra-precise relief measurements, a set of automotive feeler gauges can also be highly beneficial, though a high-quality guitar ruler with fine increments is often sufficient for general setups.
Before taking any measurements, you must tune your guitar to its standard playing pitch. The strings exert a massive amount of tension on the neck, pulling it forward. If you measure the guitar while it is out of tune or missing strings, the neck relief readings will be completely inaccurate.
Finally, pay attention to how you hold the instrument during measurement. Gravity can slightly flex a guitar neck, meaning a guitar measured flat on its back on a workbench may yield different readings than one held in the playing position. For the most accurate results, hold the guitar in your lap in the normal playing position.
Step-by-Step Guide to Measuring Neck Relief
Measuring neck relief requires you to turn the guitar’s strings into a temporary straight edge. To begin, clamp your capo securely at the first fret. This isolates the neck from any height variations caused by the nut slots, ensuring you are measuring only the curvature of the fretboard itself.
Next, press down the lowest string (the low E string) at the fret where the neck joins the body—typically around the 17th fret on electrics or the 14th fret on acoustics. This turns the string into a perfectly straight line suspended over the curved fretboard.
With the string held down, use your free hand to slide your guitar ruler or a feeler gauge under the string at the midpoint of this span. This midpoint is typically around the 7th or 8th fret. Look closely at the gap between the top of the 7th or 8th fret wire and the bottom of the string. The distance you measure here represents your neck relief.
Avoid common errors like pressing too hard on the string or reading the ruler at an angle. Looking from an angle introduces parallax error, making the gap appear larger or smaller than it actually is.
Once you have measured the relief on the bass side, repeat the entire process on the highest string (the high E string). Comparing the relief on both sides of the neck helps you identify if the neck has twisted. While a slight difference is common due to the varying tension of thick and thin strings, a significant discrepancy may indicate a structural issue that requires professional attention.
Step-by-Step Guide to Measuring String Action
Once you have verified that your neck relief is correct, you can proceed to measure the string action. Keep the guitar tuned to pitch and held in the playing position without using a capo.
First, check the action at the first fret (nut action). Place the end of your guitar ruler directly on top of the first fret wire, right next to the string, and read the distance to the bottom of the string. If this gap is too high, the guitar will be difficult to play in open positions and notes will go sharp when fretted.
Next, move down to the 12th fret to measure the bridge action, which dictates the overall playability of the instrument. Place the flat edge of the guitar ruler on top of the 12th fret wire, holding the tool perfectly perpendicular to the fretboard. Measure the distance from the top of the 12th fret to the bottom of the low E string, and then repeat the measurement for the high E string.
When reading the ruler, always align your eyes with the bottom edge of the string. The string should sit directly over the measurement markings without obscuring them. If the ruler is tilted forward or backward, the reading will be inaccurate, so keep the tool perfectly upright.
Keep in mind that target clearances vary by guitar type. Electric guitars generally allow for lower action than acoustics because electric strings vibrate with less physical amplitude. Always check your manufacturer’s specifications for recommended starting points.
Interpreting Your Measurements and Next Steps
After gathering your measurements, you must interpret the numbers to decide on your next steps. Most guitar rulers display measurements in both millimeters and fractions of an inch (such as 64ths). If your neck relief measurement is virtually non-existent—meaning the string is resting flat against the 7th fret when held down—your neck is too straight or back-bowed, which will cause severe buzzing. If the gap is excessively large, the neck has too much forward bow, resulting in high action in the middle of the fretboard.
If you decide to make adjustments, you must follow the correct logical order. Always adjust the neck relief first by turning the truss rod. Turning the truss rod clockwise tightens it, straightening the neck and reducing relief; turning it counterclockwise loosens it, allowing the string tension to pull the neck forward and increase relief. Only after the relief is set should you adjust the string action at the bridge saddles or the nut.
While basic setups are highly manageable, you must recognize when to stop. If you attempt to adjust the truss rod and find that it is extremely stiff, stuck, or has reached the end of its threads, stop immediately. Forcing a stuck truss rod can permanently damage or snap the rod, resulting in an expensive repair.
Similarly, if you experience persistent fret buzz on only one or two specific frets after setting the correct relief and action, your guitar likely has uneven frets. Correcting this requires specialized leveling and crowning tools. If you suspect structural issues or feel uncomfortable performing adjustments, take your instrument to a qualified luthier.
Frequently Asked Questions (FAQ)
Can I use a standard hardware store ruler instead of a specialized guitar ruler?
While you can use a standard hardware store ruler for rough estimates, it is not recommended for precise setups. Standard rulers typically have a blank space of unmeasured metal at the end before the zero mark begins, making it impossible to get an accurate reading from the fret wire. They are also too thick to fit comfortably between closely spaced strings, and their markings lack the fine increments required. A specialized guitar ruler is thin, starts its scale exactly at the physical edge, and features highly legible increments designed specifically for instrument work.
How often should I measure my guitar's action and neck relief?
You should measure your guitar’s setup at least twice a year, ideally during seasonal transitions when humidity and temperature shift. Wood is a natural material that expands and contracts with environmental changes, directly affecting the neck bow. Beyond seasonal checks, you should immediately measure your setup if you experience physical symptoms like sudden fret buzz, increased finger fatigue, or if you travel frequently with your instrument.
Does changing string gauge require re-measuring with the guitar ruler?
Yes, changing your string gauge will almost always require you to re-measure and adjust your setup. Heavier strings exert significantly more tension on the neck than lighter strings, pulling the neck forward and increasing relief. Switching to lighter strings does the opposite. Whenever you change string gauges, install the new strings, tune to pitch, let the guitar settle, and use your guitar ruler to re-evaluate both the neck relief and the string action.
Community discussion
Share your experience or ask a question. Comments are reviewed before publication.