
The JOYO Jam Buddy 2 is a highly portable, rechargeable guitar amplifier that doubles as a versatile tool for mobile karaoke and practice sessions. Whether you are practicing in your living room, performing in a local community space, or busking outdoors, setting up this compact unit to handle a microphone, guitar, and backing tracks simultaneously is a straightforward process. By utilizing its dedicated inputs and wireless connectivity, you can create a balanced, portable performance rig without the need for a bulky external mixer. Achieving a clear, professional-sounding mix requires understanding the correct signal paths, selecting the right cables, and balancing your volume levels to prevent feedback and distortion.
Gathering the Right Cables and Power Sources
Before you begin connecting your gear, it is essential to gather the correct cables and ensure all your devices are properly powered. The JOYO Jam Buddy 2 features a dedicated microphone input alongside its standard guitar input and auxiliary options. To connect a vocal microphone, you will need a cable that matches the amplifier’s input jack. Most standard dynamic microphones utilize an XLR connection at the microphone end, which must adapt to a 6.35mm (1/4-inch) TS mono jack to plug into the amplifier’s microphone port. Double-check your microphone cable to ensure it has the correct 6.35mm connector rather than a balanced XLR connector, as the amplifier’s mic input is designed for standard instrument-style jacks.
Next, determine how you plan to play your backing tracks. If you prefer a wireless setup, ensure your smartphone, tablet, or laptop has Bluetooth enabled. If you prefer a more stable, wired connection, you will need a 3.5mm-to-3.5mm auxiliary cable. If your modern mobile device lacks a dedicated headphone jack, make sure you have a compatible USB-C or Lightning adapter on hand to connect the auxiliary cable.
Products mentioned in this guide
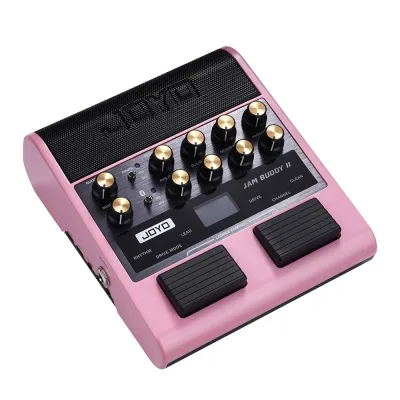
Prices are valid at publication and may change. Please refer to the product page for the latest price.
Power management is equally critical for an uninterrupted session. The JOYO Jam Buddy 2 is equipped with a built-in rechargeable battery, making it ideal for mobile use. Before starting, charge the amplifier fully using its designated power adapter. If you are performing near a wall outlet, keeping the unit plugged in ensures a stable power supply and prevents any sudden drops in volume or unexpected shutdowns. Additionally, verify that your playback device and any active microphones or wireless receivers are fully charged or connected to their respective power sources.
Plugging In and Setting the Microphone Level
Once your cables are ready, you can begin the physical setup. Start with the amplifier turned off to prevent any loud pops or surges that could damage the speakers. Insert your microphone’s 6.35mm connector firmly into the port labeled for microphone input. Ensure the cable is pushed all the way in; a loose connection can introduce unwanted hum, static, or intermittent signal dropouts during your performance.

Before flipping the power switch, locate the dedicated microphone volume or gain control on the amplifier’s control panel. Turn this knob completely to the left (the minimum setting). It is a common mistake to leave volume controls turned up from a previous session, which can lead to immediate, deafening feedback loops the moment the system is powered on.
With the microphone volume minimized, turn on the JOYO Jam Buddy 2. Hold the microphone at your normal singing distance—typically a few centimeters from your mouth—and begin speaking or singing a test phrase. Slowly rotate the microphone volume knob clockwise. Continue increasing the level until your voice sounds clear, full, and sufficiently loud to match the natural acoustics of your room. If you hear a high-pitched squeal or whistle, immediately turn the volume down slightly and adjust your position relative to the amplifier.
Streaming or Wiring Your Backing Tracks
With your vocals established, the next step is routing your karaoke backing tracks into the amplifier. You have two primary methods to achieve this: wireless Bluetooth streaming or a wired auxiliary connection.
To set up a Bluetooth connection, activate the Bluetooth pairing mode on the JOYO Jam Buddy 2. This is typically done by pressing the dedicated Bluetooth button on the control panel until an indicator light begins to flash, signaling that the amplifier is discoverable. Open the Bluetooth settings on your mobile device, scan for available devices, and select the amplifier from the list. Once paired, the indicator light should turn solid, and a brief tone may play to confirm the connection. Play a backing track from your preferred music or karaoke app to verify that the sound is routing through the amplifier’s speakers.
If you prefer a wired setup to guarantee maximum audio stability, connect one end of your 3.5mm auxiliary cable to your playback device (using an adapter if necessary) and the other end to the port labeled AUX on the JOYO Jam Buddy 2. This physical connection bypasses any potential wireless interference, making it an excellent choice for crowded environments or areas with heavy wireless traffic.
Regardless of the connection method you choose, managing your source device’s volume is crucial. Set the volume on your smartphone or tablet to around 70% to 80% of its maximum capacity. Setting the source volume too low forces you to crank the amplifier’s volume, which can introduce background hiss. Conversely, maxing out the source volume can overload the amplifier’s input stage, resulting in harsh digital clipping. Use the amplifier’s physical controls to make the final adjustments to the backing track’s overall volume.
Mixing Your Guitar, Vocals, and Karaoke Track
Achieving a professional-sounding performance relies on creating a balanced mix where your vocals, guitar, and backing tracks complement rather than compete with one another. When all three sources play simultaneously, they can easily turn into a muddy wall of sound if not mixed carefully.
Begin by adjusting the backing track volume. The music should serve as a supportive foundation for your performance. Set the backing track level so that it is clearly audible but sits slightly below your live vocal level. Your singing must remain the focal point of the performance, so your voice should always cut through the mix clearly.
Next, plug your guitar into the main instrument input and adjust the guitar channel’s volume. The guitar should blend smoothly with the backing track. If you are playing rhythm guitar, keep the volume level balanced with the mid-range frequencies of the backing track. If you are playing lead lines or solos, you may want to set the guitar volume slightly higher so it can step forward during instrumental sections, but be sure to roll it back or play softer when you begin singing again.
If the overall sound feels cluttered, look at the amplifier’s tone or EQ controls. Many portable amplifiers feature basic equalization knobs, such as bass and treble controls. If the mix sounds boomy or muddy, try reducing the bass frequencies slightly on the guitar channel. This frees up the lower-mid frequencies for your vocals, allowing your voice to sound more distinct and preventing the overall audio from becoming congested, especially in smaller indoor spaces like typical HDB apartments.
Soundchecking and Fixing Common Audio Issues
Before you begin performing for an audience or recording your session, conduct a thorough soundcheck. Play a representative portion of a backing track while singing and playing your guitar at your full performance volume. This allows you to hear how the components interact when pushed to higher volumes and helps you identify any potential issues before they disrupt your performance.
One of the most common issues encountered during mobile karaoke setups is microphone feedback. Feedback occurs when the sound from the amplifier’s speakers enters the microphone, gets re-amplified, and creates a continuous, high-pitched loop. To prevent this, never stand directly in front of the JOYO Jam Buddy 2 while holding an active microphone. Position the amplifier slightly to your side or ahead of you, pointing away from the microphone’s capsule. Additionally, maintain a reasonable distance from the unit and avoid pointing the microphone directly at the speaker grille. If feedback occurs, lower the microphone volume slightly or adjust the tone controls to reduce high frequencies.
Another common issue is audio dropouts or latency when using Bluetooth. If you notice that the backing track stutters, cuts out, or lags behind your playing, check for physical obstructions between your mobile device and the amplifier. Keep your device within a clear line of sight and close to the unit. If you are performing in an area with high wireless congestion, switching to a physical auxiliary cable is the most reliable way to eliminate latency and ensure a flawless, real-time performance.
Frequently Asked Questions (FAQ)
Can I use a wireless microphone system with this amplifier?
Yes, you can integrate a wireless microphone system with the JOYO Jam Buddy 2, provided the wireless receiver has a compatible output. Most portable wireless microphone receivers feature a 6.35mm (1/4-inch) TS output plug or cable that can connect directly to the amplifier’s microphone input. Before purchasing or connecting a wireless system, check the receiver’s output specifications. Ensure it outputs a mic-level or adjustable line-level signal; an excessively hot output signal can overload the amplifier’s preamp, resulting in harsh distortion that cannot be resolved by adjusting the amplifier’s volume controls alone.
Why is there a delay between my singing and the Bluetooth backing track?
This delay, known as audio latency, is an inherent characteristic of wireless Bluetooth transmission. When you stream audio via Bluetooth, your playback device must compress the audio data, transmit it wirelessly through the air, and the amplifier must then decode and play it. This process takes a fraction of a second. While this latency is negligible when listening to pre-recorded music, it becomes highly noticeable and distracting when you are trying to sing or play an instrument in perfect synchronization with a backing track. To eliminate this delay entirely and ensure real-time monitoring, it is highly recommended to use a wired 3.5mm auxiliary cable to connect your playback device directly to the amplifier’s AUX input.
Community discussion
Share your experience or ask a question. Comments are reviewed before publication.