
Soundproofing a home music practice space without major renovations is entirely possible if you focus on targeted, non-destructive noise insulation. While you cannot achieve absolute silence without tearing down walls, you can significantly reduce sound leakage by sealing air gaps, decoupling vibrating gear, and adding temporary mass to weak points. This approach keeps your landlords or condo management happy while allowing you to practice your instrument with peace of mind.
In high-density urban environments like Singapore, where concrete walls are common but shared slabs and doors remain major weak points, understanding how sound travels is the first step to controlling it. You do not need to knock down walls or spend thousands of dollars on permanent construction. By understanding the difference between sound absorption and sound blocking, you can strategically place temporary materials to keep your music inside your room.
Diagnosing Sound Leakage in Your Practice Room
To build an effective noise insulation strategy, you must first identify how and where sound escapes. Sound behaves like water; it will find the path of least resistance. If there is even a tiny gap under your door or a crack in a window seal, sound waves will pour through it, rendering other insulation efforts far less effective.
Products mentioned in this guide

![[SG Stock] SoundProof Panel for Wall Self adhesive Hexagon Foam Acoustic Panels Home Sound-Absorbing Studio](https://img.lazcdn.com/g/p/4f6037997d2d531bf13e27506f4e4526.jpg_400x400q80.jpg_.webp)

Prices are valid at publication and may change. Please refer to the product page for the latest price.
Acoustic noise is generally divided into two categories: airborne noise and structure-borne (or impact) noise. Airborne noise includes vocals, woodwinds, brass instruments, and the sound radiating from guitar amplifiers. These waves travel through the air and escape through physical openings or by vibrating thin barriers like windows and doors.
Structure-borne noise, on the other hand, occurs when an object physically impacts a surface, sending vibrations directly through the building’s structure. Examples include the thud of a kick drum pedal, the low-frequency rumble of a bass cabinet sitting directly on the floor, or the mechanical clicking of electronic drum pads. These vibrations travel efficiently through solid concrete floors and steel beams, often emerging as a dull, irritating hum in adjacent rooms.
Before purchasing any materials, perform a thorough inspection of your practice room. Close the door and windows, turn on a bright light inside, and look from the outside to see if any light leaks through the frames. Any visible light indicates an air gap where sound can easily escape. Pay close attention to shared walls, thin window panes, and hard flooring surfaces, as these are the primary pathways for sound transmission.
Non-Permanent Noise Insulation Solutions for Common Weak Points
Addressing sound leakage does not require permanent alterations to your living space. For renters or those wishing to avoid messy construction, several reversible, highly effective methods can target specific weak points without leaving a trace when it is time to move out.

Sealing Airborne Leaks at Doors and Windows
The entryway to your practice room is often the single greatest contributor to sound leakage. Standard interior doors are frequently hollow-core, meaning they act as drumheads, vibrating and transmitting sound easily. To combat this without replacing the door, start by sealing the perimeter. Installing removable silicone or rubber weatherstripping along the door frame creates a tight seal when the door is closed, blocking airborne sound waves.
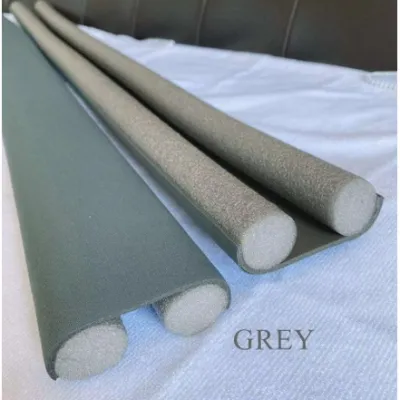
The gap at the bottom of the door is another major culprit. A heavy-duty, slide-on or tension-based door sweep can seal this gap without requiring screws. For the door body itself, hanging a heavy, multi-layered acoustic blanket or a sheet of mass-loaded vinyl over the back of the door can add the mass needed to dampen sound transmission.
Windows are another weak link, especially in older buildings with thin, single-pane glass. Installing temporary acoustic window inserts—which are acrylic panels designed to press-fit tightly into the window frame using a rubber gasket—creates an insulating air pocket that dampens sound. Alternatively, hanging dense, multi-layered blackout curtains that extend well past the window frame can help absorb mid-to-high frequencies.
Before applying any adhesive weatherstripping or hanging heavy fixtures, check the manufacturer instructions for both the adhesive product and your door or window frames. To protect your security deposit, test any adhesive on a small, hidden area first to ensure it will not peel away paint or leave permanent residue. If the manufacturer instructions conflict with your surface type, or if you are dealing with delicate finishes, opt for tension-based or non-adhesive mounting options.
Managing Wall Transmission Without Structural Changes
Shared walls are a common source of friction between musicians and neighbors. When sound waves hit a wall, they cause it to vibrate, transmitting the sound to the other side. To reduce this transmission without drilling into the drywall, you must add mass and dampening.
One highly effective, non-permanent method is placing tall, heavy furniture against the shared wall. A floor-to-ceiling bookshelf packed tightly with books provides excellent mass and irregular surfaces that help diffuse sound. Alternatively, you can use freestanding acoustic panels mounted on heavy-duty studio stands or tripod bases. These can be positioned directly in front of the wall to catch sound waves before they make contact with the structure.
It is vital to distinguish between sound absorption and sound blocking. Many retail products marketed as “soundproofing foam” or lightweight egg-carton panels are designed solely for sound absorption. They reduce echo and flutter reflections inside the room to improve recording quality, but they lack the mass required to stop sound from passing through a wall. To block sound from leaving, you need heavy, dense materials. Always check product labels and manufacturer specifications for material density and thickness rather than relying on vague marketing terms like “soundproof.”
Isolating Floor Vibrations and Impact Noise
Structure-borne noise is particularly challenging because solid building materials like concrete and wood conduct low-frequency vibrations incredibly well. To prevent your downstairs neighbors from hearing every beat of your metronome or kick drum, you must decouple your instruments and equipment from the floor.
For guitar amplifiers, subwoofers, and studio monitors, use specialized isolation risers or anti-vibration pads. These accessories typically feature high-density foam or rubber layers designed to absorb mechanical vibrations before they reach the floorboards. For electronic drum kits, which generate significant impact noise from pedal strikes, constructing a temporary “tennis ball riser”—where two sheets of sturdy plywood sandwich a layer of tennis balls—creates an effective, inexpensive decoupling platform.
Additionally, cover hard flooring with thick, high-density rugs. For maximum effectiveness, place a dedicated acoustic underlayment made of dense felt or recycled rubber beneath the rug. This combination not only dampens the sound of foot traffic and dropped gear but also helps absorb high-frequency reflections within the room, creating a more controlled acoustic environment.
Selecting Effective Acoustic Materials and Accessories
When shopping for noise insulation products, navigating the sea of marketing jargon can be overwhelming. To make informed purchasing decisions and avoid costly mistakes, you must evaluate materials based on scientific metrics rather than promotional claims.
Prioritize mass and density when your primary goal is blocking sound. Materials like mass-loaded vinyl (MLV) are highly effective because they pack immense weight into a thin, flexible sheet, making them easy to hang temporarily and roll up when moving. When selecting acoustic panels for absorption, look for dense fiberglass or rockwool cores rather than lightweight polyurethane foam, as these dense mineral fibers are far more efficient at absorbing lower frequencies.
Always verify the manufacturer’s technical specifications and acoustic ratings. Look for the Sound Transmission Class (STC) rating, which indicates how effectively a material blocks airborne sound, and the Noise Reduction Coefficient (NRC), which measures how much sound a material absorbs. Ensure the product you select is rated for your specific noise type; for instance, a material with a high NRC may do very little to block the transmission of a loud brass instrument if it lacks a high STC rating.
In addition to acoustic performance, prioritize safety and environmental compatibility. Enclosed practice spaces, particularly in humid climates like Singapore, can easily trap moisture, leading to mold growth behind temporary wall treatments. Choose materials with certified low volatile organic compound (VOC) emissions to protect your indoor air quality. Furthermore, ensure any acoustic blankets, panels, or foams carry verified Class A fire safety ratings to prevent creating a fire hazard in your home.
Supplementing Physical Insulation with Practice Habits
Even the best non-permanent noise insulation has its limits. To ensure completely harmonious relations with those around you, combine your physical soundproofing efforts with smart practice habits and modern low-volume technology.
Modern musical accessories offer outstanding silent practice capabilities. For guitarists and bassists, headphone amplifiers, digital amp modelers, and software-based amp simulators allow you to play through high-quality studio headphones with the exact tone of a cranked amplifier. Woodwind and brass players can utilize electronic silent mute systems that reduce the acoustic output of the instrument to a whisper while routing the sound to headphones. If you play drums, switching to an electronic kit equipped with mesh heads rather than rubber pads will drastically reduce the physical impact noise of your practice sessions.
When purchasing digital practice tools, headphone amplifiers, or silent instrument systems, always verify the device compatibility, required interfaces, and authorized software sources before buying, as specific model specifications dictate performance rather than generic brand names.
Be mindful of where you position your equipment. Avoid pointing speaker cones directly at shared walls, doors, or windows. Keep your amplifiers elevated on stands rather than sitting flat on the floor, and position them toward the interior of your apartment rather than toward an exterior wall.
Finally, align your practice schedule with local housing guidelines and neighbor preferences. In Singapore, the Housing & Development Board (HDB) and condo management boards typically specify quiet hours, often between 10:30 PM and 7:00 AM. Even outside these hours, having an open conversation with your immediate neighbors to establish mutually agreeable practice windows can prevent disputes and ensure you can practice without anxiety.
When DIY Methods Are Not Enough
While temporary noise insulation methods can dramatically reduce sound leakage and make your practice space highly functional, they cannot achieve absolute silence. Complete acoustic isolation—often referred to as a “room-within-a-room” or a floating room—requires specialized structural construction, including double-stud walls, resilient channels, and multiple layers of heavy drywall separated by acoustic damping compounds.
If you find that your DIY efforts are still resulting in complaints, or if you are practicing highly disruptive instruments like acoustic drums or grand pianos at professional volumes, it may be time to seek alternative solutions. Stop attempting further DIY modifications and consult a qualified professional acoustic engineer. They can provide precise measurements and suggest targeted structural interventions if you own the property, or help you identify when renting a dedicated, professionally soundproofed external rehearsal studio is the more practical and cost-effective path forward.
Frequently Asked Questions (FAQ)
Does acoustic foam stop sound from leaving the room?
No, acoustic foam is designed solely to absorb high-frequency sound reflections and reduce echo within a room to improve internal recording quality. Because it is incredibly lightweight and porous, it lacks the mass and density required to block sound waves from passing through walls and escaping the room.
Can I completely soundproof a room without renovations?
No, complete soundproofing requires structural decoupling and immense mass, which cannot be achieved with non-permanent, renter-friendly methods. However, by using high-density materials, sealing air leaks, and isolating vibrations, you can achieve a significant reduction in sound leakage that makes home practice highly viable and neighbor-friendly.
Community discussion
Share your experience or ask a question. Comments are reviewed before publication.