
Choosing your first keyboard stand holder is just as important as selecting the instrument itself. A proper support system provides a stable foundation that protects your keyboard from costly falls while ensuring you can practice in an ergonomically correct position. To find the right fit, you must balance your keyboard’s physical dimensions and weight against the stand’s structural design, adjustability, and footprint. By focusing on these core specifications, you can secure a reliable setup that fits your home space and budget without paying for unnecessary professional touring features.
Identify Your Keyboard's Size and Weight Requirements
Before browsing online marketplaces or local music shops, you must gather the exact physical specifications of your keyboard. Do not rely on visual estimates; instead, consult the manufacturer’s manual or check the product label on the underside of the instrument. Note the exact weight of the keyboard and its key count, which typically ranges from 61 keys for compact beginner models to 88 keys for full-sized digital pianos. An 88-key weighted action keyboard is significantly heavier and longer than a semi-weighted 61-key model, requiring a much more robust support system.
Once you know the weight, compare it to the maximum load capacity specified by the keyboard stand holder. Always apply a generous safety margin rather than matching the weight exactly. For instance, if your digital piano weighs 12 kg, choose a stand rated for at least 20 kg or more. This buffer accounts for the downward force applied when you play dynamically or rest your hands on the keys.
Products mentioned in this guide
Prices are valid at publication and may change. Please refer to the product page for the latest price.
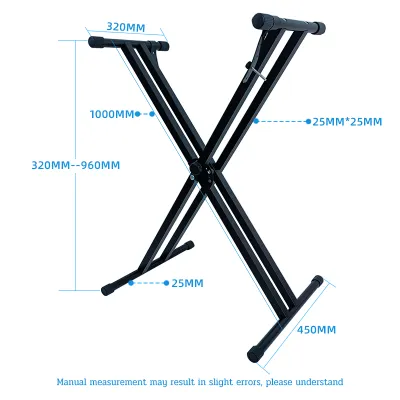
Additionally, measure the depth and width of your keyboard’s base. The support arms of the stand should support at least 70% to 80% of the keyboard’s depth to prevent it from tipping forward or backward. If the stand’s arms are too short, the instrument will feel unstable; if they are too long, they may protrude awkwardly, creating a safety hazard in tight living spaces.
Compare the Main Types of Keyboard Stands
Keyboard stands come in several distinct structural designs, each offering unique advantages depending on your playing environment and lifestyle. As a beginner, your choice will largely depend on whether you plan to practice in a fixed spot at home or need a portable setup that can be packed away after each session. Understanding the trade-offs between portability, floor footprint, and legroom will help you narrow down the options to the style that best matches your daily routine.

X-Style and Double X-Style Stands
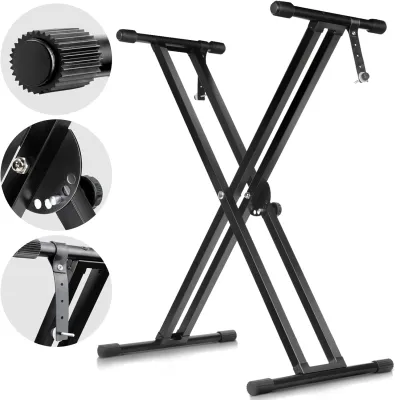
X-style stands are the most common entry-level options due to their simplicity and affordability. These stands feature a classic scissor-like design that folds completely flat, making them exceptionally easy to store under a bed or behind a wardrobe—a major benefit for compact apartments where space is at a premium. A single-braced X-stand consists of a single set of crossing metal bars, which is highly portable and perfectly adequate for lightweight 61-key beginner keyboards.
For slightly heavier instruments or more enthusiastic playing styles, a double-braced X-stand offers a significant upgrade. This design uses two parallel metal bars on each side, greatly reducing side-to-side wobble. However, both single and double X-stands share a common ergonomic limitation: the crossing bars restrict your legroom when playing while seated. If you prefer to sit down to practice, your knees may repeatedly bump into the frame, forcing you to sit further back and strain your arms. Additionally, as you adjust an X-stand to its maximum height, the width between the top support arms narrows, which can make wider keyboards feel less stable.
A-Style and Z-Style Stands
If you plan to set up a dedicated practice corner where the instrument remains assembled, Z-style and table-style (often referred to as A-style or platform) stands offer superior stability and comfort. Z-style stands are shaped like the letter “Z,” providing a highly rigid frame that distributes weight straight down to the floor. This design virtually eliminates horizontal wobble, even during energetic practice sessions or when supporting heavy 88-key digital pianos.
The primary advantage of Z-style and platform stands is the abundance of open legroom. Because there are no crossing diagonal bars directly beneath the center of the keyboard, you can slide your bench fully forward and sit with natural, relaxed posture. This is crucial for beginners, as proper posture prevents wrist fatigue and back strain during long practice sessions.
The trade-off for this stability and comfort is a larger physical footprint and reduced portability. Z-style stands are heavier, more cumbersome to disassemble, and take up more floor space than their folding X-style counterparts. They are best suited for permanent home setups where you do not need to pack the equipment away after every use. If you have a dedicated room or a spacious living area, investing in a Z-style stand provides a highly secure, piano-like feel that encourages regular practice.
Evaluate Adjustability and Ergonomic Features
A good keyboard stand holder must adapt to your physical height and seating arrangement to promote healthy playing habits. When evaluating different models, pay close attention to the height adjustment mechanisms. Lower-end stands often use simple friction knobs that require you to unscrew, adjust, and retighten a bolt. While functional, these can slip if not tightened securely. A more reliable option is a spring-loaded pull-lock pin mechanism, which snaps into pre-drilled holes along the frame, ensuring the stand cannot suddenly collapse under load.
Consider your potential future needs as you progress in your musical journey. Some high-quality stands are modular, allowing you to attach a second tier later on. This second tier can hold a MIDI controller, a laptop, or sheet music, saving you from buying an entirely new stand as your gear collection grows. Verify whether the stand you are purchasing is compatible with these official add-ons before making a decision.
Finally, inspect the contact points where the stand meets both the floor and your instrument. Look for thick, non-slip rubber end caps on the feet to prevent the stand from sliding on smooth tile or laminate flooring. The upper support arms should feature rubber pads or foam cushioning to grip the bottom of your keyboard securely and protect its plastic casing from scratches. Some stands also include safety straps that screw directly into the threaded brass inserts found on the underside of many digital pianos, locking the instrument firmly to the stand.
Check Stability, Build Quality, and Safety Limits
Before finalizing your purchase, it is essential to assess the overall build quality of the stand to ensure long-term durability. Look closely at the thickness of the steel tubing; thicker, heavy-duty steel provides a more rigid frame that resists bending over time. Examine the joint welds as well. Clean, continuous welds indicate strong construction, whereas patchy or thin welds can be a weak point prone to cracking under stress.
The locking joints are the most critical safety components on any adjustable stand. Ensure that all adjustment teeth, pins, and clamps engage fully without any play or wiggle. If a locking mechanism feels loose or fails to seat deeply into its designated slot, it poses a severe risk of sudden collapse.
Always read the manufacturer’s safety warnings, assembly instructions, and weight limits carefully. These documents outline the maximum safe operating height and load distribution guidelines. Never exceed these limits, and pay attention to any warning signs, such as a slight tilt or bowing in the metal frame. If you notice any structural deformation, stop using the stand immediately and contact the manufacturer for guidance.
Step-by-Step Selection and Setup Checklist
To ensure a safe and successful setup, follow this logical step-by-step process when selecting and assembling your new keyboard stand holder:
- Verify Specifications: Double-check your keyboard's weight and dimensions against the stand's rated load capacity and arm length, ensuring a comfortable safety margin.
- Assemble on a Flat Surface: Lay out all components in a spacious, flat area. Follow the manufacturer's step-by-step assembly sequence precisely, using the provided tools or a high-quality screwdriver to tighten all bolts.
- Engage All Locks: Ensure that all pull-pins, safety knobs, and locking collars are fully engaged and tightened. Do not rely on hand-tightening alone if the manual specifies using a tool.
- Perform a Stability Test: Before placing your keyboard on the stand, press down firmly on the center and sides of the empty frame. Check for any rocking, sliding, or unevenness on your floor. Adjust the leveling feet if your stand is equipped with them.
- Secure the Keyboard: Carefully place your keyboard onto the support arms, centering it perfectly to balance the weight. If your stand and keyboard support safety straps, screw them in securely.
- Monitor and Maintain: Periodically check the tightness of the bolts and the condition of the rubber pads. If any part feels loose, misaligned, or unstable during play, stop immediately and consult a professional or the manufacturer.
Frequently Asked Questions (FAQ)
Can I use a generic table or desk instead of a dedicated keyboard stand holder?
While placing your keyboard on a standard writing desk or dining table is physically possible, it is highly discouraged for ergonomic and safety reasons. Standard tables are typically around 70 to 75 cm high, which is too tall for comfortable keyboard playing when seated on a standard chair. This height mismatch forces you to raise your shoulders and bend your wrists at an awkward angle, leading to rapid fatigue and potential repetitive strain injuries. Furthermore, generic tables lack the non-slip padding, safety straps, and precise height adjustments of a dedicated keyboard stand holder, increasing the risk of the instrument sliding off the edge.
Do I need a double-braced stand for a lightweight 61-key beginner keyboard?
For a lightweight 61-key keyboard, which typically weighs under 5 kg, a standard single-braced X-stand is generally sufficient and highly cost-effective. However, if you plan to play dynamically, practice with heavy key strikes, or anticipate upgrading to a heavier 88-key digital piano in the near future, investing in a double-braced stand from the start is a smart decision. The double-braced design provides extra lateral stability, preventing the annoying side-to-side sway that can occur even with lighter instruments during fast-paced practice sessions.

Community discussion
Share your experience or ask a question. Comments are reviewed before publication.