
Selecting your first keyboard or digital piano is an exciting milestone, but finding the right support for it is just as critical to your playing experience. A shaky, poorly matched stand can distract you from practice, cause physical discomfort, or even put your instrument at risk of falling. Many beginners assume that any universal stand will fit their keyboard, only to discover that the weight capacity is insufficient or the height cannot be adjusted to a comfortable level.
To make an informed decision, you must evaluate the physical specifications of your instrument alongside your personal playing habits. Matching a stand requires checking the keyboard’s exact dimensions, total weight, and your own ergonomic needs. By taking a systematic approach to measurements, design styles, and safety features, you can establish a stable, comfortable practice space that supports your musical journey for years to come.
Measure Your Keyboard: Weight, Width, and Depth
Before browsing online marketplaces or visiting a local music store, you must gather the precise physical specifications of your keyboard. The most critical metric is the instrument’s weight, which determines the load capacity your stand must support. You can find this information in the manufacturer’s user manual or on the official product specification sheet. Do not rely on estimates, as digital pianos with weighted hammer-action keys are significantly heavier than basic electronic keyboards, often weighing between 11 kg and 25 kg, whereas non-weighted 61-key models usually weigh under 5 kg.
Products mentioned in this guide
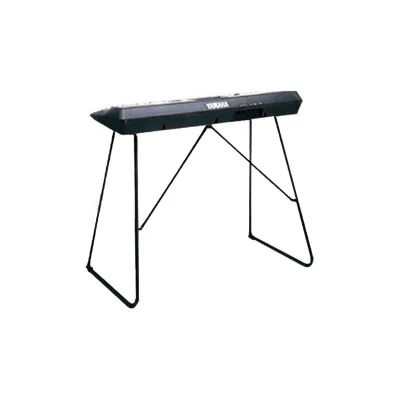

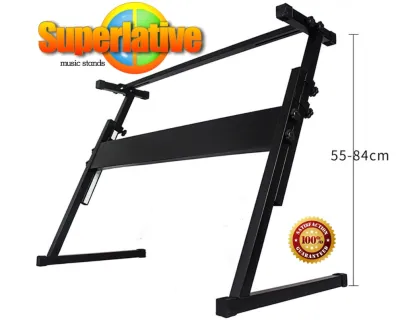
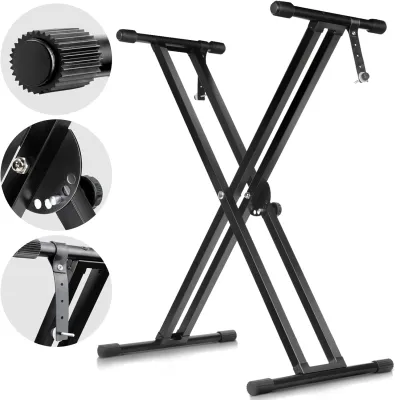

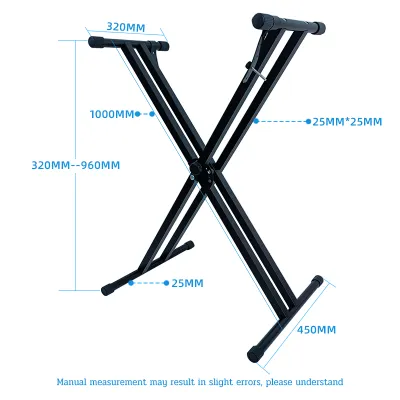
Prices are valid at publication and may change. Please refer to the product page for the latest price.
Next, measure the total width and depth of your keyboard to understand its physical footprint. Keyboards generally fall into three categories based on key count: 61-key, 76-key, and 88-key models. An 88-key digital piano requires a much wider support base to prevent the ends from sagging or tipping when you play notes at the extreme high or low registers. Conversely, a compact 61-key keyboard has a narrow frame that might not span the width of larger, heavy-duty stands, causing it to sit unevenly or slip through the support arms.
Finally, inspect the bottom surface of your keyboard before choosing a stand design. Turn the instrument over gently and look for any protruding screws, battery compartments, rubber feet, or ventilation grates. Some stands feature flat support arms that require a completely flat keyboard base to sit securely. If your keyboard has protruding elements, you will need a stand with adjustable rubber pads or a design that allows you to position the support bars around these obstacles without compromising stability.
Compare Common Stand Designs for Your Instrument Size
Keyboard stands come in several distinct structural designs, each offering unique trade-offs in terms of stability, portability, and legroom. The most common option is the X-style stand, which is available in both single-braced and double-braced configurations. Single-braced X-stands feature a single set of crossing metal bars, making them lightweight, highly portable, and easy to fold flat for storage. They are highly suitable for lightweight 61-key keyboards but are generally too unstable for heavy 88-key digital pianos. Double-braced X-stands utilize a dual-bar design that significantly increases weight capacity and lateral stability, though both styles share a common drawback: the crossing bars restrict your legroom, making it difficult to sit comfortably with your knees under the keyboard.

For players using heavier 88-key digital pianos, Z-style stands offer a much more robust and ergonomic solution. Named for their Z-shaped side profiles, these stands provide exceptional structural rigidity and can support substantial weight without wobbling. Because the support frame is pushed to the outer edges of the keyboard, Z-stands offer completely unobstructed legroom, allowing you to sit comfortably and use sustain pedals naturally. While they are bulkier and take longer to disassemble than X-stands, their stability makes them an excellent choice for a permanent home practice setup.
Table-style stands, also known as platform stands, feature four independent, adjustable legs similar to a standard table. These stands provide a wide, flat, and incredibly stable platform that can easily accommodate heavy digital pianos and synthesizers. They offer maximum legroom and allow you to adjust the height of each leg individually, which is highly useful for leveling the stand on slightly uneven floors. The primary trade-off is that table-style stands have a larger floor footprint and do not fold down as compactly as X-stands, making them less ideal if you need to pack up your gear frequently.
If you plan to expand your setup in the future, you might also consider multi-tier stands or stands that accept add-on tiers. These configurations allow you to mount a second keyboard, a laptop, or a music production controller directly above your primary instrument. While a beginner rarely needs a multi-tier setup immediately, choosing a base stand that is compatible with future expansion accessories can save you the cost of buying an entirely new stand later on.
Verify Stability and Adjustability Features
Once you have identified the right stand style for your keyboard, you must examine the specific mechanical features that ensure safety and ease of use. Start by evaluating the locking mechanism used to secure the stand’s height and width. High-quality stands typically use spring-loaded pull-knobs, heavy-duty safety pins, or secure bolt-through designs. Avoid stands that rely solely on friction-based clamping levers, as these can slip over time under the weight of heavy playing, causing the stand to collapse unexpectedly.
The contact points where the stand meets both your keyboard and the floor are equally important for stability. Look for stands equipped with thick, textured rubber end caps on the feet to prevent the stand from sliding on tile or wooden floors. The upper support arms should feature non-slip rubber sleeves or foam padding to protect your keyboard’s plastic or wooden chassis from scratches and to keep the instrument from shifting forward or backward while you play.
Adjustability is another key factor, particularly for Z-style and table-style stands. Many of these models allow you to adjust not only the height but also the width of the frame. This feature is incredibly valuable because it allows you to customize the stand to match the exact width of your keyboard, ensuring that the support arms align perfectly with the structural frame of your instrument rather than resting on delicate plastic casing or battery covers.
Always read the manufacturer’s official weight limit label rather than guessing the stand’s capacity based on its visual thickness. A stand may look sturdy, but its joints, welds, and locking pins dictate its true weight capacity. Ensure the rated limit exceeds your keyboard’s weight by a comfortable margin, especially if you tend to play with a heavy, expressive touch or if you frequently rest heavy music books or tablets on the music stand.
Match the Stand to Your Playing Posture and Space
Your physical comfort during practice is directly linked to how well your stand accommodates your playing posture. If you plan to practice primarily while seated, you must calculate the required legroom to ensure your knees and thighs fit comfortably under the stand. This is especially important if you use a standard piano bench and a sustain pedal, as your feet need clear access to the floor without striking the stand’s crossbars. If you choose an X-stand, you may find that you have to sit further back, which can strain your back and arms over long practice sessions.
If you prefer to play standing up, or if you want the flexibility to switch between sitting and standing, verify the stand’s maximum height adjustment range. Proper ergonomic posture requires your elbows to be at roughly a 90-degree angle when your hands rest on the keys, with your wrists relaxed and straight. Ensure the stand can extend high enough to achieve this alignment without becoming top-heavy or wobbly at its maximum extension.
You must also evaluate the physical footprint of the stand in relation to your living space. In Singapore, where residential space in HDB flats or condominiums is often carefully optimized, a massive table-style stand might block walkways or crowd a bedroom. If your practice area is multi-functional, a double-braced X-stand that can be folded flat and slid under a bed or behind a wardrobe in seconds is highly practical. If you have a dedicated corner for your music, a Z-stand or a dedicated wooden furniture stand provides a cleaner, more permanent aesthetic that complements your home decor.
Final Safety and Setup Checks Before You Play
Before placing your keyboard on your new stand, perform a thorough safety check to ensure everything is secure. Assemble the stand on a completely flat, level surface and apply gentle downward pressure to check for any wobble. If the stand rocks, adjust the leveling feet—many modern stands have adjustable rubber end caps that can be rotated to compensate for uneven flooring. Tighten all knobs, bolts, and safety pins completely before introducing the weight of your instrument.
If your keyboard has threaded mounting holes on its bottom surface, check if your stand includes matching securing straps. These straps screw directly into the underside of the keyboard and anchor it to the stand’s frame, providing excellent protection against accidental bumps or energetic playing. If your keyboard does not have these mounting points, you can use a thin, non-slip silicone mat between the keyboard and the stand arms to add an extra layer of friction.
Cable management is another critical safety consideration that is often overlooked. Route your power cables, headphone cords, and pedal wires neatly along the frame of the stand, securing them with hook-and-loop straps or cable ties. Loose, dangling cables present a tripping hazard that could easily pull your keyboard off the stand or damage the input jacks on the back of your instrument.
Finally, always trust your instincts during setup. If the stand feels unstable, flexes under moderate pressure, or if your keyboard’s weight is close to the stand’s maximum rated limit, do not risk using it. Stop immediately and consult the manufacturer’s support team or seek advice from a professional technician to find a more suitable support system.
Frequently Asked Questions (FAQ)
Can I use a generic folding table instead of a dedicated keyboard stand?
While a generic folding table might seem like a convenient, low-cost alternative, it is generally unsuitable for learning the piano. Standard household tables are typically designed for sitting and dining, meaning their height is fixed and often too high or too low for proper keyboard ergonomics, which can lead to wrist strain. Additionally, folding tables lack the structural rigidity required to handle the lateral forces of playing, resulting in significant wobbling. They also lack open legroom underneath for sustain pedals and do not offer secure mounting options to prevent your instrument from sliding off.
Do I need a double-braced X-stand for a 61-key beginner keyboard?
For a lightweight 61-key beginner keyboard, a single-braced X-stand is usually perfectly adequate. These keyboards typically weigh under 5 kg, which is well within the weight capacity of a standard single-braced stand. However, if you plan to upgrade to a heavier 76-key or 88-key instrument in the near future, or if you tend to play with a very energetic, heavy touch, investing in a double-braced X-stand from the start is a wise decision. The double-braced design offers superior lateral stability and prevents the annoying side-to-side sway that can occur even with lighter keyboards.
How do I keep my keyboard from sliding forward when I play?
To prevent your keyboard from sliding, first check if your stand came with securing straps that screw into the threaded holes on the bottom of your keyboard. If these are not available, you can place aftermarket non-slip rubber pads or a thin silicone grip mat on the stand’s support arms. Ensure the rubber end caps on the stand’s arms are clean and free of dust, as dust can reduce friction. Avoid using permanent adhesives, double-sided tape, or heavy glues on your keyboard, as these can permanently damage the plastic finish and lower the resale value of your instrument.

Community discussion
Share your experience or ask a question. Comments are reviewed before publication.